How to Use a 3D Printer: A Complete Step-by-Step Guide for Beginners
Learn how to use a 3D printer from unboxing to finished print. This beginner's guide covers setup, calibration, your first print, and the mistakes to avoid on day one.
Using a 3D printer is easier than most people expect. The machines look complex, but the actual workflow is straightforward: prepare a file, set up the printer, hit print, and wait.
This guide walks you through the entire process of how to use a 3D printer, from the moment you open the box to holding your first finished print. Whether you just bought your first machine or you are still deciding, this is the 3d printing basics roadmap that gets you printing with confidence.
The key thing to understand: 3D printing is not a one-shot skill. It is a loop of setup, print, learn, adjust. Your first print might not be perfect, and that is completely fine. By your third or fourth print, you will feel like you know what you are doing.
What You Need Before Your First Print
Before you power on your printer, make sure you have everything ready. Missing one item can stall your entire first session.
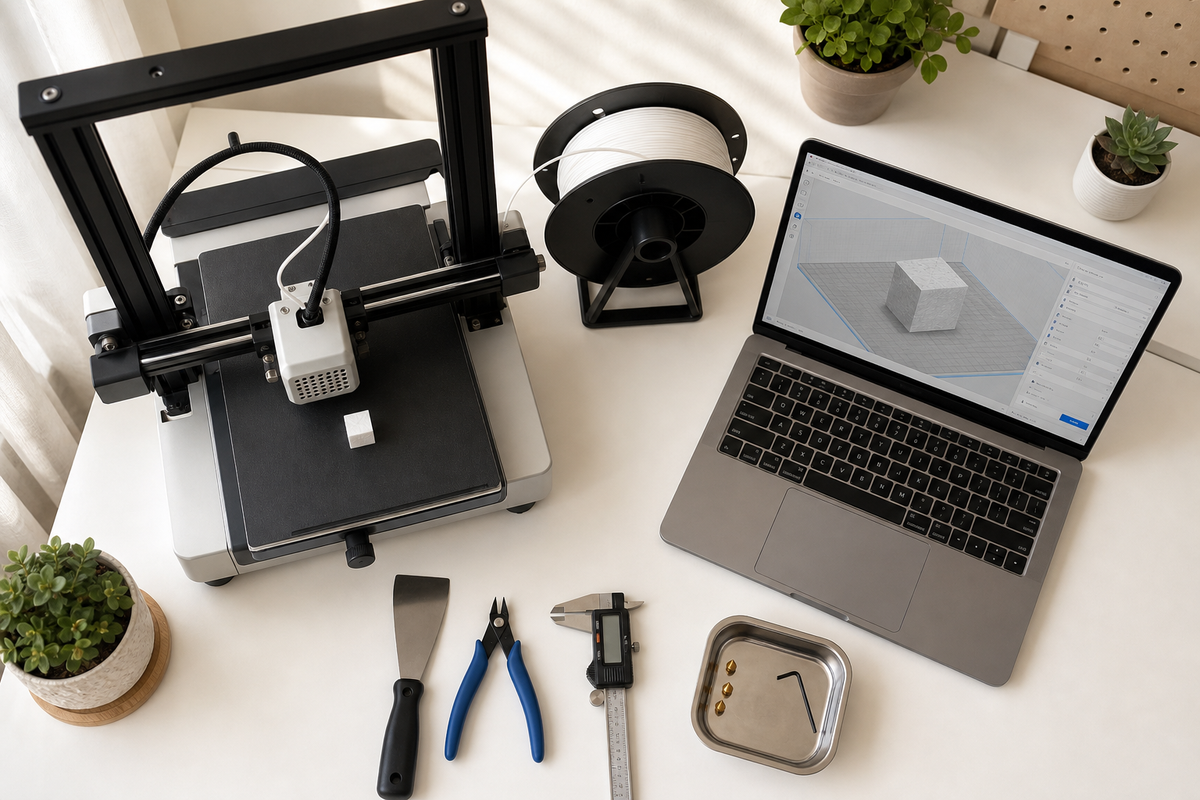
Hardware Essentials
- A 3D printer (FDM printers are the standard for beginners)
- Filament (start with PLA, it is the most forgiving material)
- Basic tools: a spatula or scraper for removing prints, flush cutters for trimming, and digital calipers if you want to check dimensions
Most printers ship with a starter tool kit and a small sample of filament. That is enough to get you through your first few prints, but you will want a full 1kg spool of PLA ready to go.
Software You Will Use
You need two types of software:
A slicer converts your 3D model into instructions the printer can follow. The three most popular free options:
- Cura (works with almost every printer brand)
- PrusaSlicer (excellent preset profiles, great for beginners)
- Bambu Studio (best if you own a Bambu Lab printer)
A model source gives you things to print. Start with pre-made models before designing your own:
- Thingiverse (largest free library)
- Printables (best documentation and print settings)
- MakerWorld (2 million+ free models, very active community)
Workspace Setup
Place your printer on a sturdy, level surface that does not wobble. A desk or workbench works fine. Keep it away from direct sunlight (UV degrades filament), drafts (air currents cause warping), and excessive dust.
Good ventilation matters even with PLA. You do not need a full enclosure for PLA, but printing in a closet with no airflow is not ideal.
Step 1: Unbox and Assemble Your Printer
Most consumer 3D printers arrive partially assembled. Full assembly typically takes 30 to 60 minutes following the included instructions.
Critical checks during unboxing:
- Inspect for shipping damage (bent frame rails, cracked acrylic panels)
- Remove ALL zip ties, foam blocks, and transit screws (these lock moving parts during shipping; leaving them in will damage the machine)
- Verify all parts against the included checklist
- Connect cables securely (loose connections cause random failures)
Once assembled, plug in the power cable and turn it on. Most printers will walk you through an initial setup wizard on the screen.
Do not rush this step. A printer that is physically assembled correctly gives you far fewer problems down the road.
Step 2: Calibrate Your Printer
Calibration is the single most important step for beginners. About 70% of first-print failures trace back to a miscalibrated machine, specifically a poorly leveled bed.
Level the Bed
The print bed must be perfectly parallel to the nozzle's path of travel. If one corner is higher than another, the first layer will be uneven and the print will fail.
If your printer has automatic bed leveling: run the auto-level routine from the menu. It handles the math for you, but you should still verify with a manual check afterward.
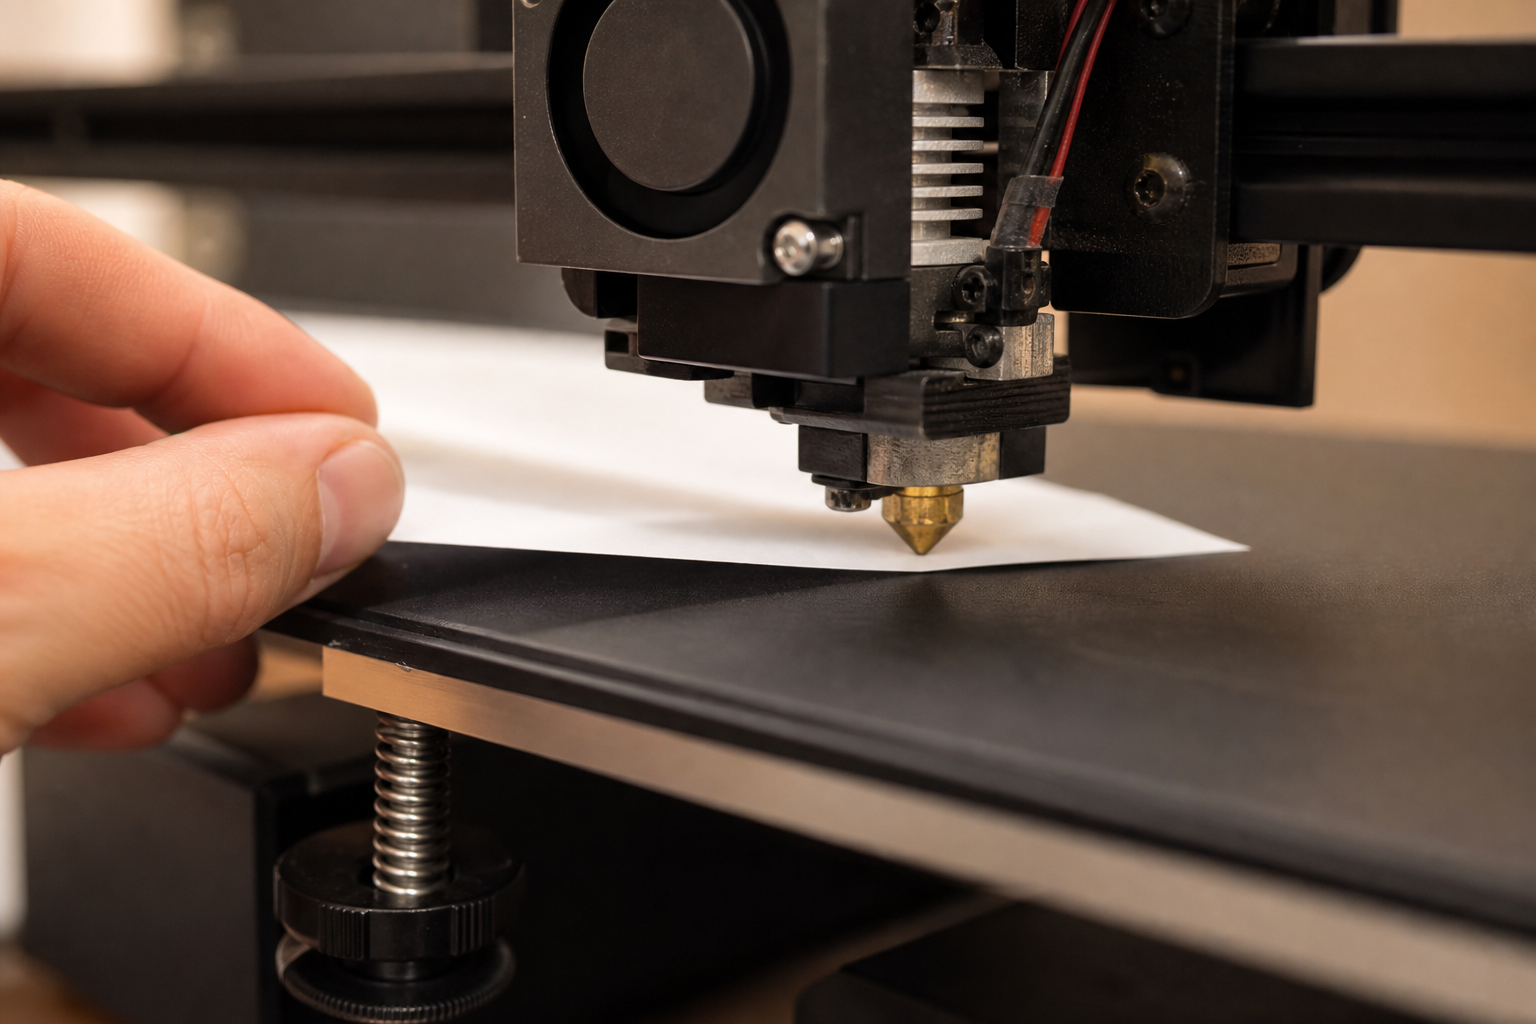
If your printer uses manual leveling: use the paper method. Place a sheet of standard printer paper between the nozzle and the bed at each corner. Adjust the leveling knobs until you feel slight friction when sliding the paper. Repeat at all four corners plus the center, then do one final pass (adjusting one corner can affect the others).
Set the Right Nozzle Height
The gap between nozzle and bed determines whether your first layer sticks:
- Too close: filament gets squished flat, nozzle scrapes the bed
- Too far: filament does not press down enough to bond, curls up and sticks to the nozzle
- Just right: filament lays down in smooth, slightly flattened lines that merge together
Run a Test Line
Before committing to a full print, extrude a test line or skirt. Watch how the plastic lays down. It should stick firmly, look consistent in width, and not ball up or drag.
Step 3: Find a Model and Slice It
Now you need something to print. Resist the urge to design your own model on day one. Start with a proven file that other people have already printed successfully.
Finding your first model:
Go to Printables or MakerWorld, search for "calibration cube" or "benchy" (a standard test boat), and download the STL or 3MF file. These models are designed to test your printer and will reveal any remaining calibration issues.
Slicing your model:
Open your slicer software, import the model file, and configure these basic settings:
- Layer height: 0.2mm (good balance of speed and quality)
- Infill: 20% (strong enough for most items, saves material)
- Print speed: use the default (do not increase speed on your first prints)
- Supports: only enable if the model has overhangs greater than 45 degrees
Click "Slice" and review the preview. The slicer shows you exactly what the printer will do, layer by layer. If anything looks wrong (floating sections, missing walls), fix it before printing.
Export the G-code file to an SD card, USB drive, or send it to the printer over Wi-Fi.
For a deeper explanation of how FDM printing works at the technical level, see our FDM 3D printing guide.
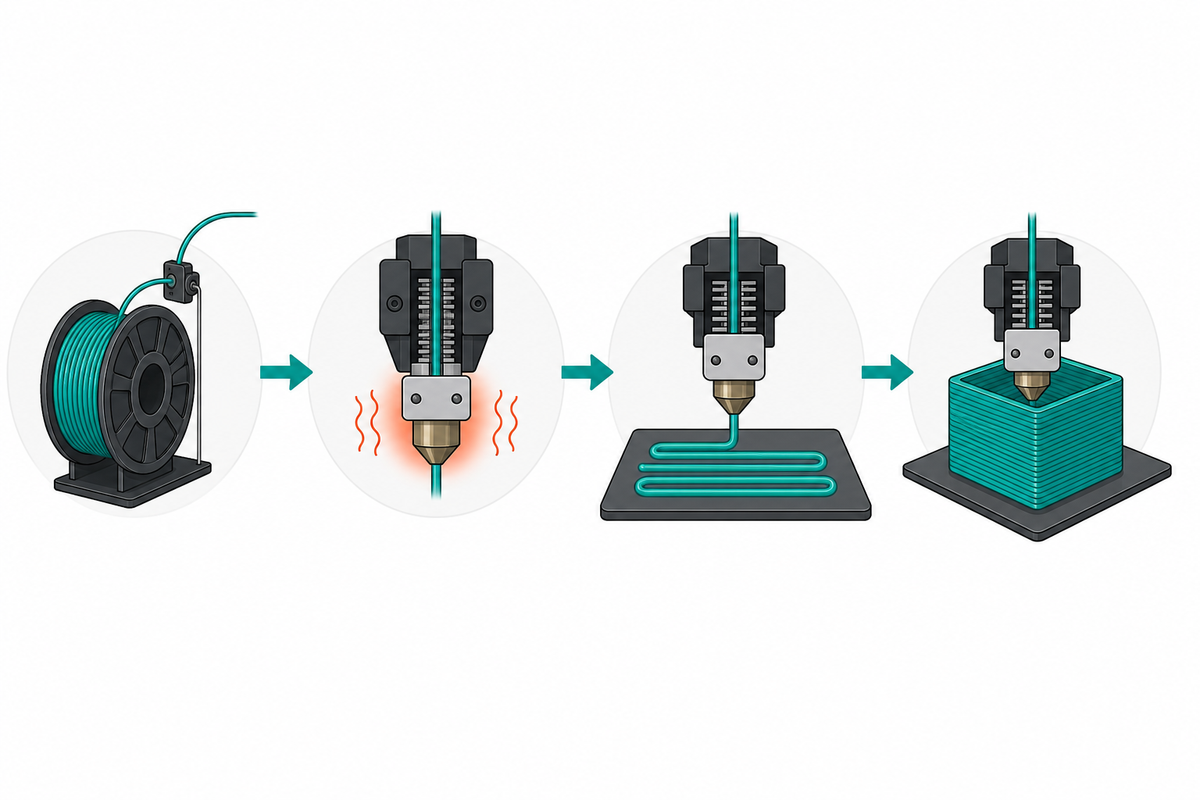
Step 4: Load Filament and Start Printing
Loading Filament
- Preheat the nozzle to the temperature your filament requires (PLA: 190-210°C)
- Cut the tip of the filament at a 45-degree angle for a clean entry
- Open the extruder lever and feed the filament into the tube until it reaches the hot end
- Use the printer menu to extrude a small amount until clean, consistent plastic flows from the nozzle
- If you see the old color or dirty filament, keep extruding until it runs clear
Starting the Print
Insert your SD card or USB stick, navigate to the file on the printer's screen, and select "Print." The printer will:
- Heat the nozzle and bed to target temperatures
- Home all axes (move to its zero position)
- Begin printing the first layer
This is where you pay close attention.
Step 5: Monitor, Remove, and Clean Up
Watch the First Layers
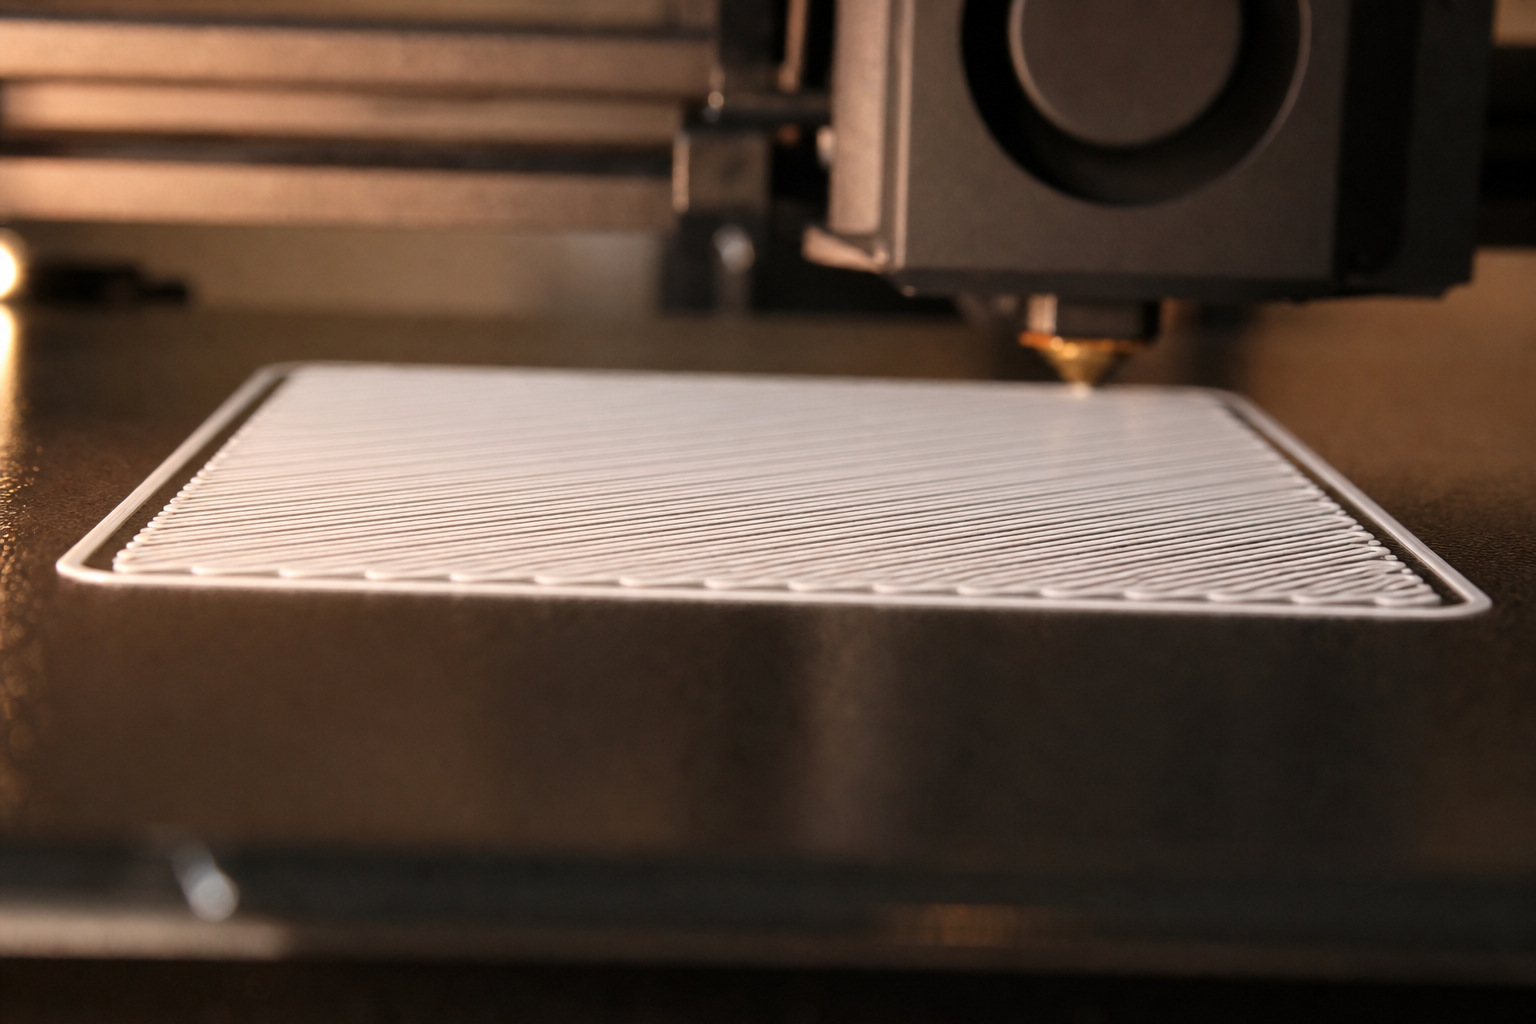
The first 2-3 layers determine whether your print succeeds or fails. Stay nearby and watch for:
- Good signs: filament sticks firmly, lines are smooth and even, no curling at edges
- Bad signs: filament dragging, not sticking, curling up, inconsistent width, nozzle plowing through previous layers
If something looks wrong in the first few layers, cancel the print immediately. Fix the issue (re-level, adjust Z-offset, clean the bed) and try again. Catching a problem at layer 2 saves you hours compared to discovering a failure at layer 200.
Once the first few layers look solid, you can check in periodically rather than watching continuously. A small print might finish in 30-60 minutes. Larger prints can run for several hours.
Removing Your Print
When the print finishes, let the bed cool down. Many print surfaces release the part automatically as they cool. If the part is still stuck:
- Use a spatula or scraper at a low angle under the part
- Gently flex the build plate if it is removable (spring steel sheets work great for this)
- Never force or pry aggressively as you can damage the bed surface
Basic Clean-Up
- Remove any brim or skirt material from the base
- Snap off support structures (if used) with pliers or your fingers
- Light sanding with fine-grit sandpaper (220+) smooths any rough spots
Congratulations. You just completed your first 3D print.
What to Print First: A Beginner's Progression Path
"I printed a test cube. Now what?" This is where most guides leave you hanging. Here is a clear progression that builds your skills in a logical order:
| Stage | What to Print | What You Learn |
|---|---|---|
| 1 | Calibration cube (20mm XYZ cube) | Dimensional accuracy, whether your printer is tuned |
| 2 | Something useful (phone stand, cable clip, drawer organizer) | Adjusting infill for strength, choosing layer height for appearance |
| 3 | Print-in-place model (articulated dragon, folding cube) | Tolerances, bridging, how moving parts work without assembly |
| 4 | Multi-part project (box with a lid, snap-fit enclosure) | Designing for fit, printing parts that assemble together |
Each stage introduces new challenges without overwhelming you. Do not jump to stage 4 on day one. Let each stage teach you something before moving on.
You can find thousands of beginner-friendly models organized by difficulty on sites like Printables and MakerWorld.
7 Mistakes Every Beginner Makes on Day One
These are not hypothetical. Every 3D printing community sees the same questions from new users within their first 48 hours:
- Skipping calibration. "It should work out of the box, right?" Rarely. Even printers with auto-leveling benefit from a quick manual verification. Five minutes of calibration saves hours of failed prints.
- Printing too fast on the first try. Default speeds exist for a reason. Increasing speed before you understand your printer's limits leads to layer shifting, poor adhesion, and ugly surfaces.
- Not cleaning the print bed. Fingerprints leave oils that prevent adhesion. Wipe the bed with isopropyl alcohol (90%+) before every print. This single habit eliminates most first-layer adhesion problems.
- Wrong temperature for the filament. PLA at 250°C will ooze and string. PLA at 170°C will not melt properly. Always check the temperature range printed on your filament spool and start in the middle of that range.
- Bad model orientation. Placing a model with a large overhang facing down creates unnecessary supports and surface defects. Rotate it in the slicer so the flattest surface sits on the bed.
- Touching the print mid-job. The printer is precise. Bumping the bed, the frame, or the print itself shifts everything by a fraction of a millimeter, which ruins the remaining layers.
- Starting with a massive print. Your first print should take under 2 hours. If it fails, you have lost minimal time and filament. Save the 14-hour helmet for when you trust your settings.
How Long Does All This Take?
If you have never touched a 3D printer before, here is what a realistic first day looks like:
| Task | Expected Time |
|---|---|
| Unboxing and assembly | 30-90 minutes |
| Calibration | 15-30 minutes |
| Finding a model and slicing it | 10-15 minutes |
| First print (small test object) | 30-90 minutes |
| Total to first completed print | ~2-4 hours |
Is it normal for the first print to fail? Yes. Surveys from 3D printing communities suggest roughly 1 in 5 first-ever prints has an issue (usually bed adhesion). This does not mean the printer is broken. It means you need a minor adjustment. By your second or third attempt, you will get it right.
How fast will you get comfortable? Most beginners who print 2-3 times per week feel confident within one to two weeks. You will not master every setting that quickly, but you will have a reliable workflow for everyday prints.
Frequently Asked Questions
How to use a 3D printer step by step?
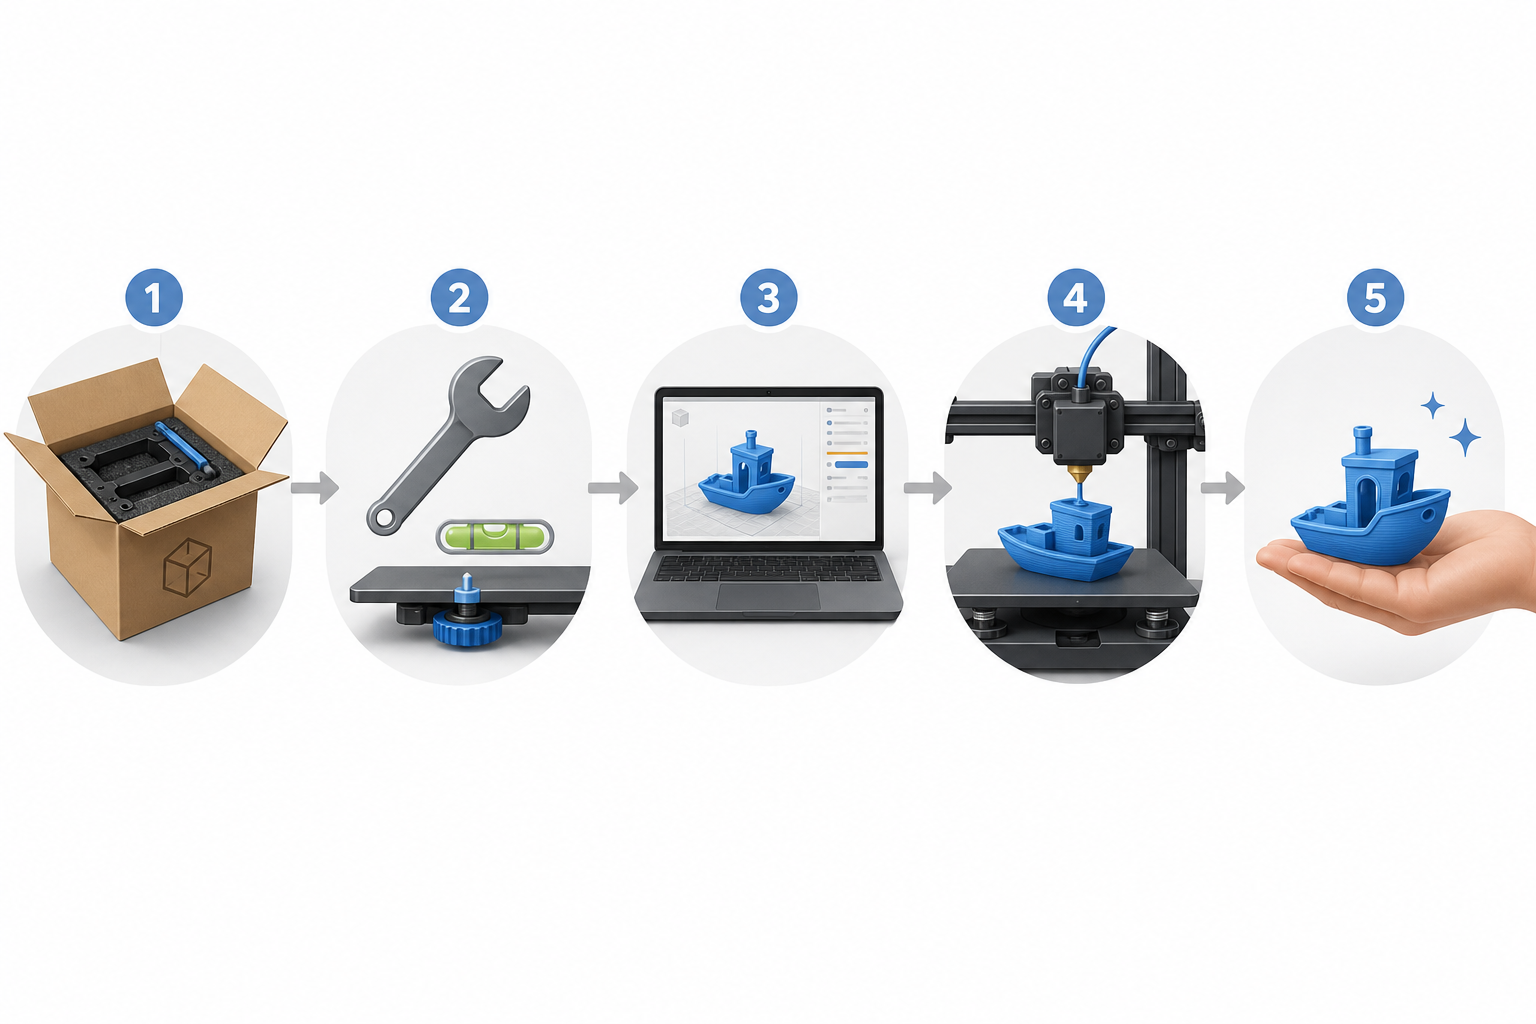
The process breaks down into five steps: (1) assemble and calibrate your printer, (2) find or create a 3D model, (3) slice it into printer instructions using software like Cura, (4) load filament and start the print, (5) monitor the first layers, then remove and clean up the finished object. The entire workflow from unboxing to first print takes 2-4 hours for a complete beginner.
Can a beginner use a 3D printer?
Absolutely. Modern 3D printers are designed for beginners, with features like auto bed leveling, touchscreen interfaces, and Wi-Fi connectivity. You do not need engineering skills or coding knowledge. If you can follow a recipe or assemble IKEA furniture, you can use a 3D printer. Start with PLA filament and pre-made models to keep things simple while you learn.
What is needed to use a 3D printer?
You need five things: a 3D printer (FDM type recommended for beginners), filament (PLA to start), slicing software (free options like Cura or PrusaSlicer), a 3D model file (download free ones from Printables or MakerWorld), and a stable workspace with basic ventilation. Most printers include starter tools and a filament sample in the box.
How to 3D print for beginners?
Start simple. Use PLA filament, download a small proven model (like a calibration cube), use your slicer's default settings, and print something that takes under an hour. Do not customize advanced settings until you understand what they do. Focus on getting the basics right: bed leveling, correct temperature, and clean first layers. Once your test prints come out consistently, gradually try larger and more complex models.