3D Print Brim: What It Is, When You Need One, and How to Set It Up
A brim is a flat ring of filament printed around the base of your model to prevent warping and improve bed adhesion. This guide covers when to use a brim, how to set it up in popular slicers, and how to remove it cleanly.
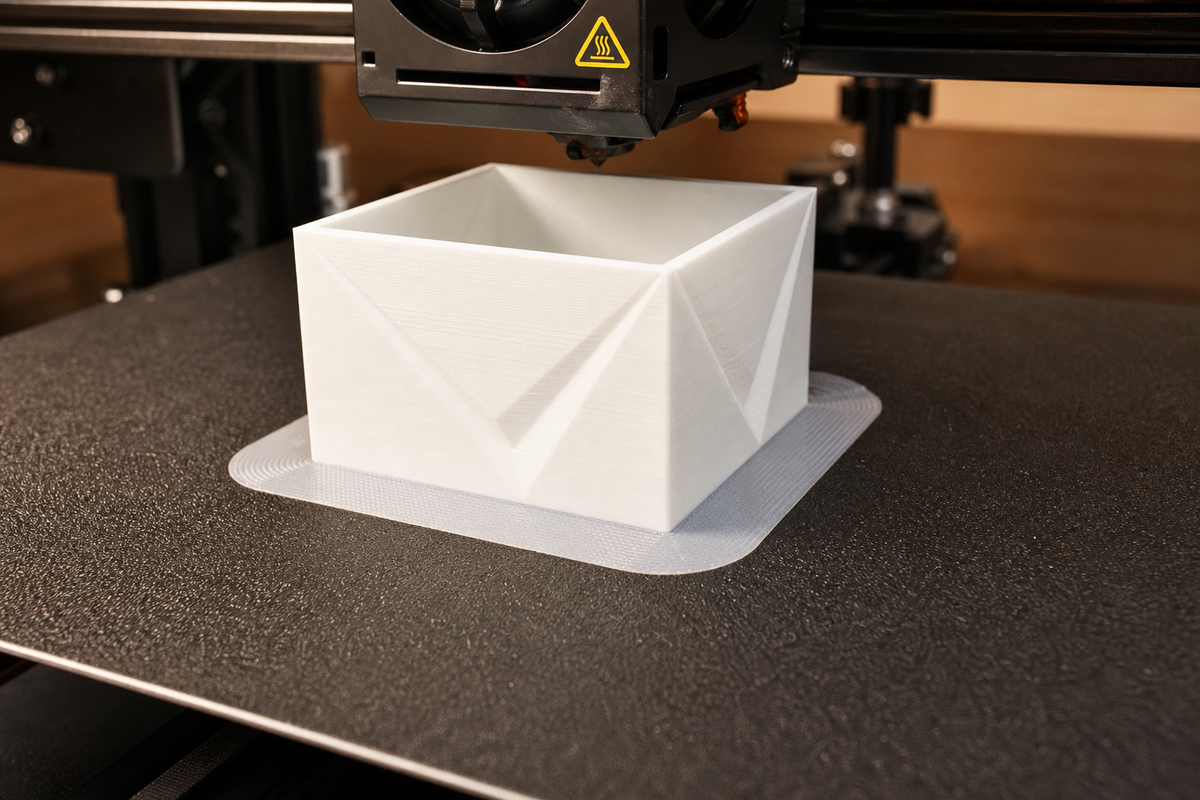
You sliced your model, hit print, and came back to find the corners peeling off the bed. Sound familiar? A 3D print brim is often the simplest fix for this exact problem, and it takes about five seconds to enable in your slicer.
In this guide, you'll learn what a brim actually does, how it compares to skirts and rafts, when you should (and shouldn't) use one, and how to configure brim settings in Bambu Studio, Cura, and PrusaSlicer.
What Is a Brim in 3D Printing?
A brim is a single-layer-thick ring of filament that extends outward from the bottom edge of your model. Think of it like the brim of a hat — it sits flat on the build plate and spreads out from the model's base.
Its job is simple: increase the contact area between your print and the bed so the edges stay stuck down during printing. Unlike a raft, a brim doesn't go underneath the model. It only attaches at the outer perimeter of the first layer.
Key characteristics:
- One layer thick (same height as your first layer)
- Extends outward from the model's edge by a set distance (usually 3–10 mm)
- Directly attached to the model's base perimeter
- Easy to remove after printing
A 3D printer brim is one of the most common tools for improving bed adhesion without changing your temperature settings or applying adhesives.
Skirt vs Brim vs Raft: What's the Difference?
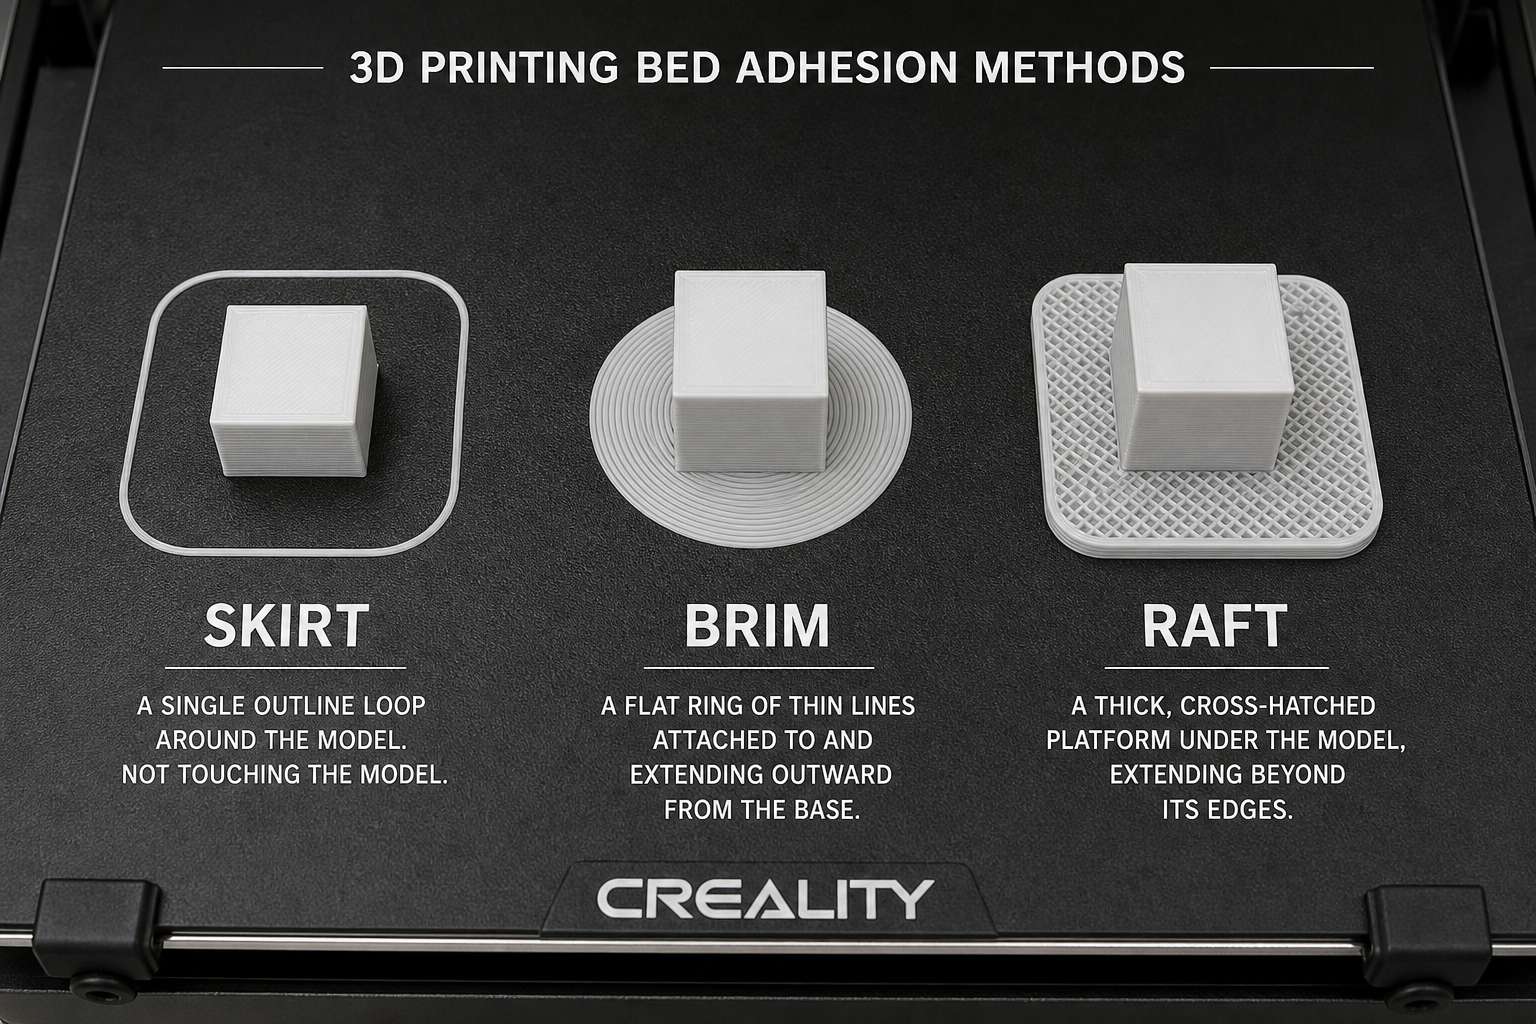
These three features all print before or alongside your first layer, but they work differently.
Skirt
A skirt is a loose outline printed around your model but not touching it. There's a gap (usually 2–5 mm) between the skirt and the model's edge. A skirt doesn't help with adhesion at all. Its purpose is to prime the nozzle and confirm your first layer height is correct before the actual print starts.
Brim
A brim is directly attached to the model's base edge and extends outward. It adds surface area to resist warping forces. A 3D print brim is the go-to choice when your model has a small footprint, thin walls, or sharp corners that tend to lift.
Raft
A raft is a thick multi-layer platform printed underneath your entire model. It provides maximum adhesion but leaves a rougher bottom surface and uses more material. Rafts are harder to remove cleanly.
| Feature | Touches Model? | Adhesion Help | Material Use | Surface Quality |
|---|---|---|---|---|
| Skirt | No | None | Minimal | No impact |
| Brim | Yes (edge only) | Moderate | Low | Minor cleanup needed |
| Raft | Yes (entire base) | Maximum | High | Rough bottom surface |
When to pick which:
- Skirt: Your model already has a large, flat base and sticks well on its own.
- Brim: Your model has a small footprint, thin walls, or corners that tend to warp. This is the most common choice for 3D print not sticking to bed issues.
- Raft: Your bed isn't level, you're printing with heavily warping materials (ABS, nylon), or the model has almost no flat base contact.
When to Use a 3D Print Brim
A brim won't help every print. Here's when it's worth enabling:
Use a brim when:
- Your model has a small base relative to its height (tall, narrow shapes)
- The first layer has thin features or sharp corners
- You're printing with materials prone to 3D printing warping (ABS, ASA, PETG at high temps)
- Your model has long, straight edges that tend to curl
- You've had first layer adhesion failures on the same model without a brim
Skip the brim when:
- Your model already has a large, flat base
- You're printing with PLA on a textured PEI sheet (usually sticks well on its own)
- The bottom surface finish is critical and you don't want to sand the brim marks
- You're printing a model that fills most of the bed plate
For PLA specifically: do you need a brim for PLA? Usually not — PLA is the least warping-prone filament, and a properly leveled bed with clean PEI or glue stick is typically enough. But if you're printing a tall, narrow PLA model, a brim is still a smart safeguard.
Types of 3D Print Brims
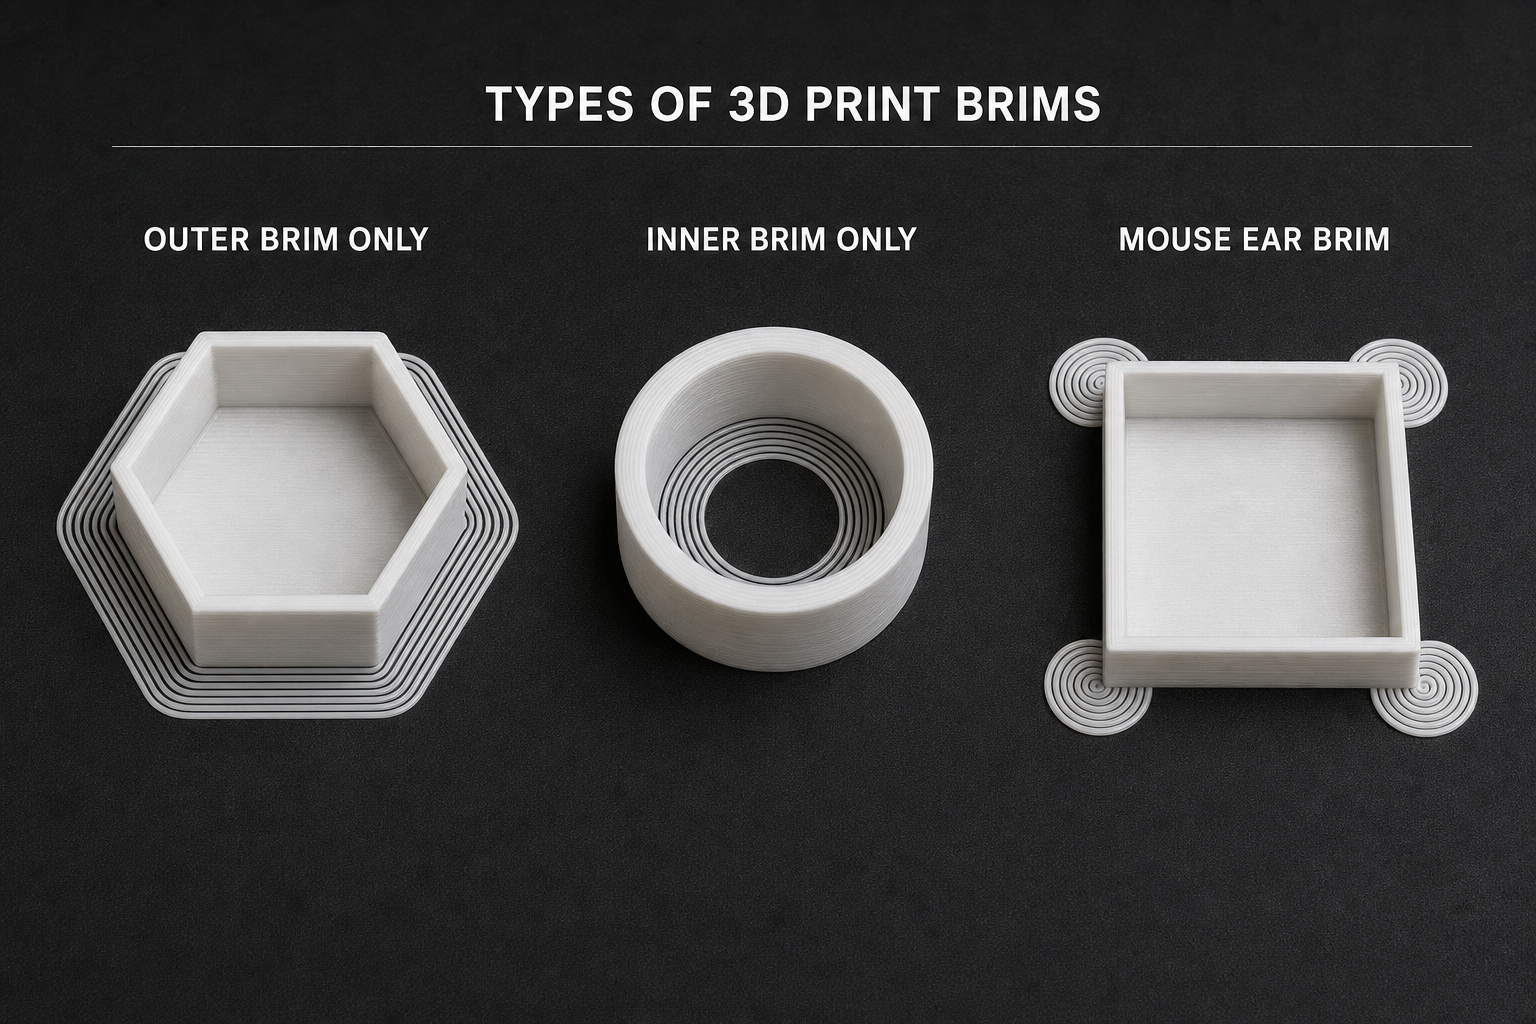
Not all brims are the same. Most slicers offer several brim variations:
Outer Brim Only
The most common type. The brim extends outward from the model's outer edges. This is the default in most slicers and works well for the majority of adhesion issues.
Inner Brim Only
The brim extends inward from the outer perimeter, filling in gaps or holes in the first layer. Useful for models with cutouts, hollow sections, or internal features that need stabilization. In Bambu Studio and Cura, this is sometimes labeled "brim inside holes" or "inner brim."
Outer and Inner Brim
Combines both — brim extends outward and fills inward. Use this for maximum adhesion on complex first-layer geometries.
Mouse Ear Brim
Instead of a continuous ring around the entire model, a mouse ear brim places small circular pads only at sharp corners or points where lifting is most likely. This saves material, reduces cleanup time, and still prevents warping where it matters most.
Mouse ear brims aren't natively supported in all slicers, but Bambu Studio has it built in (called "mouse ear" under brim type), and for Cura or PrusaSlicer you can add them manually using modifier meshes or plugins.
How to Add a Brim in Popular Slicers
How to Add a Brim in Bambu Studio
- Open your model in Bambu Studio
- Go to the Process settings panel on the right
- Click the Others tab (or search "brim")
- Under Brim type, select your preferred option:
- Auto (lets the slicer decide)
- Outer brim only
- Inner brim only
- Outer and inner brim
- Mouse ear
- Set Brim width (default is 5 mm; try 8–10 mm for problem prints)
- Slice and verify the brim appears in the preview
Bambu Studio also lets you enable brim per-object by right-clicking a model and editing its individual settings.
How to Add a Brim in Cura
- Open your model in Cura
- In the right panel, find Build Plate Adhesion section
- Set Build Plate Adhesion Type to Brim
- Adjust Brim Width (default 8 mm)
- Optionally enable Brim Only on Outside to skip inner holes
- Slice and check the preview
How to Add a Brim in PrusaSlicer
- Open your model in PrusaSlicer
- Go to Print Settings → Skirt and Brim
- Set Brim type to your choice (Outer only, Inner only, Outer and inner)
- Set Brim width (3–10 mm is typical)
- Slice and check preview
3D Print Brim Settings: What to Adjust
Beyond just enabling a brim, these settings let you fine-tune it:
Brim Width
How far the brim extends from the model. Typical values:
- 3–5 mm: Light adhesion help for minor lifting
- 5–8 mm: Standard for most prints with adhesion concerns
- 8–15 mm: Heavy-duty for warping-prone materials or tall narrow models
More width = more adhesion, but also more material and cleanup.
Brim Line Count
Some slicers use line count instead of width. Each line is roughly one nozzle width (0.4 mm). So 10 lines ≈ 4 mm of brim.
Brim Gap / Brim Distance
A small gap (0.1–0.2 mm) between the brim and the model makes removal easier without significantly reducing adhesion. Some slicers call this "brim separation distance." If you struggle to remove brims cleanly, try setting this to 0.1 mm.
Brim-Object Overlap
In Bambu Studio, you can control how much the brim overlaps onto the model's first layer. A small overlap (0.05–0.1 mm) ensures the brim bonds firmly to the model.
How to Remove a Brim from a 3D Print
Removing a 3D print brim is straightforward, but rushing it can damage your model:
Best removal methods:
- By hand: If the brim is thin and PLA, you can often peel it off with your fingers once the print cools. Flex the build plate slightly to help release it.
- Craft knife / deburring tool: Slide a sharp blade along the model's edge where the brim meets the perimeter. Work slowly and keep the blade angled away from the model.
- Flush cutters: For thicker brims or tight corners, flush cutters give clean breaks without requiring you to twist or pull.
Tips for cleaner removal:
- Wait until the print is fully cool before removing the brim
- Set a brim gap of 0.1 mm in your slicer so the brim barely touches the model
- Use 200–400 grit sandpaper to smooth any remaining brim marks at the base
- Mouse ear brims are much faster to remove than full-perimeter brims
Troubleshooting: Brim Not Working as Expected
Brim Still Lifting Off the Bed
If the brim itself is peeling up, the issue isn't brim settings — it's bed adhesion in general. Check:
- Bed level / Z-offset (first layer should be slightly squished)
- Bed temperature (try +5°C for the first layer)
- Bed cleanliness (wipe with IPA)
- If all else fails, switch to a raft or apply a bed adhesion aid
Brim Too Hard to Remove
- Reduce brim width to the minimum that still prevents warping
- Add a brim gap / separation distance of 0.1–0.2 mm
- Switch to mouse ear brims at corners only
- Ensure you're not over-squishing the first layer (lower Z-offset slightly)
Brim Leaving Marks on Model Edge
This is normal. A light pass with fine sandpaper (400 grit) removes brim witness lines. For prints where bottom-edge appearance matters, consider using a raft instead (it separates from the model bottom, not the edge) or skip adhesion aids entirely and address the root cause of your adhesion problem.
Outer vs Inner Brim: Which to Pick?
For most prints, an outer brim is all you need. It fights the most common failure mode: edges peeling upward from the bed.
Use an inner brim when your model has:
- Large holes or cutouts in the first layer
- Thin-walled cylinders or rings
- Interior features that separate from the bed before the outer walls have enough layers to stabilize them
In practice, "outer and inner brim" (both) is the safest choice if you're unsure. The extra material is minimal and removal is only slightly more work.
FAQ
What's the point of a brim in 3D printing?
A brim increases the surface area of your model's first layer by adding a flat ring of filament around its base. This extra contact helps the print stay stuck to the bed during printing, preventing warping and lifting — especially on models with small footprints or sharp corners.
How do I add a brim to my 3D print?
In most slicers, go to your build plate adhesion or "skirt and brim" settings and select "Brim" as the adhesion type. Then set a brim width (5–10 mm is typical). In Bambu Studio, it's under Process Settings → Others → Brim type.
Do you need a brim for PLA?
Usually not. PLA is the least warping-prone filament, and it sticks well to PEI, glass, or glue-stick-coated beds. But for tall narrow PLA models, long thin parts, or prints with very small bases, a brim is still a good safety measure.
Does higher bed temperature improve adhesion?
Yes, within reason. Increasing bed temperature by 5–10°C on the first layer can improve how well the filament bonds to the bed surface. But going too high can cause elephant's foot (the first layer bulging outward). For PLA, 55–65°C is the sweet spot; for PETG, 75–85°C. A brim combined with proper bed temperature is more effective than either alone.
What adhesive is used for 3D printing beds?
Common bed adhesives include glue stick (PVA-based), hairspray, 3D printing-specific adhesion sprays, and painter's tape. These create a grippy layer between the filament and the bed surface. You can use them with or without a brim for extra holding power.
How to make a 3D printer bed stick?
Ensure the bed is clean (wipe with isopropyl alcohol), properly leveled, and at the right temperature for your filament type. If prints still don't stick, add a brim, apply glue stick or hairspray, or slow down your first-layer speed. Most first-layer adhesion problems come from Z-offset being too high (nozzle too far from bed).