3D Print Not Sticking to Bed: The Complete Bed Adhesion Fix Guide
Your 3D print won't stick to the bed? Walk through every cause and fix — from a 2-minute clean to material-specific settings — so your first layer sticks every single time.
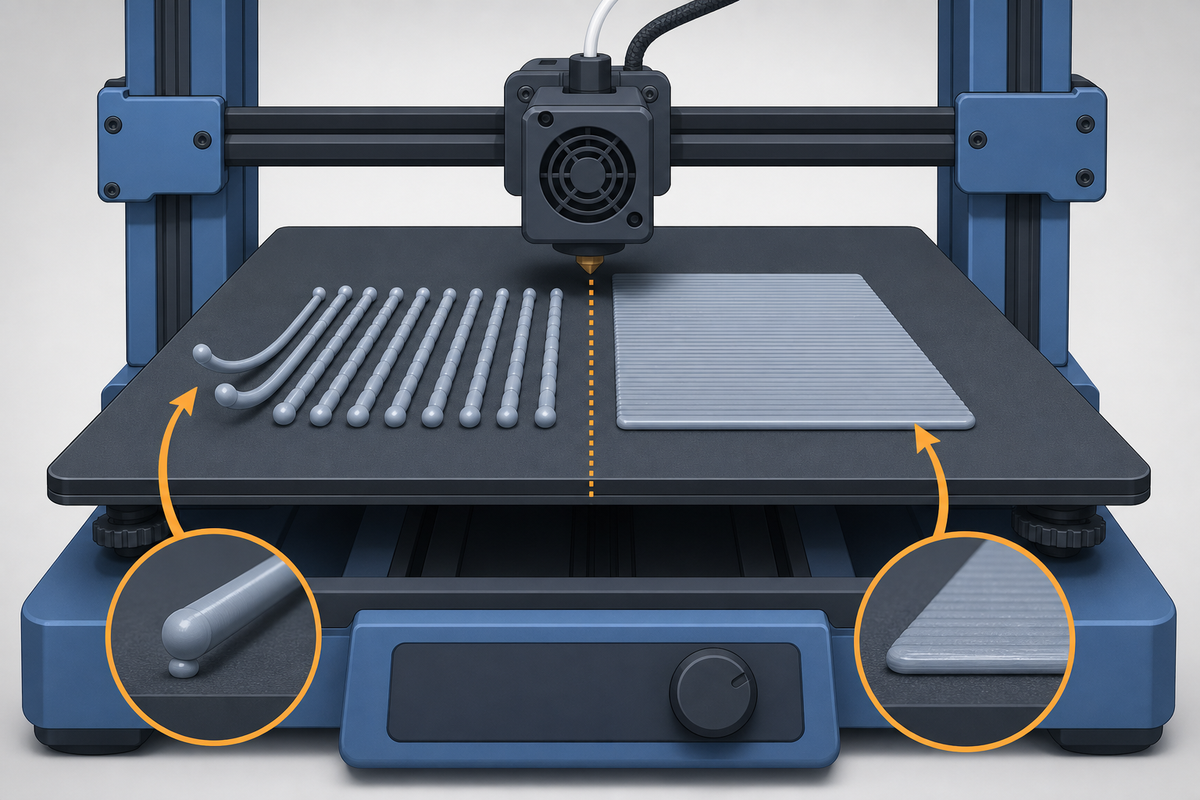
You hit "Print," walk away, and come back to spaghetti plastic dragged across the bed. Sound familiar? A 3D print not sticking to bed is the single most common failure beginners face — and one of the most fixable.
Here's the mental model that makes everything click: bed adhesion is a tug-of-war. On one side, adhesion forces hold your print down. On the other, shrinkage forces from cooling plastic try to peel it up. Every fix in this guide tips the balance toward adhesion. (If you're brand new to FDM 3D printing, this is how every desktop printer works — melted plastic, laid down layer by layer, starting from the bed up.)
The good news? You don't need to guess. This guide walks you through the causes in order of likelihood, gives you a 2-minute quick fix, then goes deeper with 10 proven solutions — organized from fastest to most involved. Let's get your prints to stick.
Why Your 3D Print Won't Stick to the Bed (5 Root Causes)
Before fixing anything, understand why it happens. Almost every case of 3d printer bed adhesion failure traces back to one of these five causes:
1. Dirty Bed Surface
Oils from your fingers, dust, and leftover adhesive residue create an invisible barrier between filament and bed. Even a single fingerprint can ruin adhesion in that spot. This is the number-one cause of sudden adhesion failure.
2. Bed Not Level or Z-Offset Wrong
If your nozzle is too far from the bed, filament lays down as a round bead that barely touches the surface. Too close, and it scrapes the bed or blocks flow entirely. Either way, nothing sticks properly.
3. Wrong Temperature Settings
A cold bed lets plastic shrink and curl up. A cold nozzle makes filament too thick to bond. And a bed that's too hot can cause elephant's foot or make PETG fuse permanently to PEI.
4. First Layer Printing Too Fast
Speed is the enemy of first-layer bonding. If the nozzle moves too quickly, filament doesn't have time to melt into the surface and form a mechanical bond.
5. Wrong Bed Surface for Your Material
PLA on bare glass with no adhesive? PETG on smooth PEI? Some combinations simply don't work without help. Matching your material to the right surface (or adding the right adhesive) solves a huge category of problems.
The 2-Minute Fix: Try These 3 Things First
More than 90% of bed adhesion problems come down to one of these three issues. Before changing any slicer settings, start here:
Step 1: Clean your bed. Wipe the cool bed with a lint-free cloth and 90%+ Isopropyl Alcohol (IPA). Don't touch the surface afterward.
Step 2: Check your Z-offset. Use the paper test — slide a sheet of paper between the nozzle and bed. You should feel slight resistance, like a light pinch. If the paper slides freely, you're too high.
Step 3: Verify bed temperature. Make sure it matches your material: 60°C for PLA, 70–85°C for PETG, 100–110°C for ABS.
If your 3d printer not sticking to bed problem disappears after these three steps, you're done. If not, keep reading.
How to Watch Your First Layer and Know Immediately If It'll Fail
Most beginners start a print and walk away. Then they return hours later to find a mess. Here's a better approach: watch the first 30 seconds. You can diagnose the problem immediately.
What a GOOD First Layer Looks Like
- Lines are flat and slightly wider than they are tall (lightly "squished")
- Adjacent lines touch each other with no gaps
- Surface looks smooth and consistent
- Lines don't curl up behind the nozzle
What a BAD First Layer Looks Like
| Symptom | Likely Cause | Fix |
|---|---|---|
| Round, spaghetti-like lines that don't flatten | Nozzle too far (Z-offset too high) | Lower Z-offset by 0.05mm |
| Lines curl up and stick to nozzle | Bed too cold or dirty | Clean bed + check temp |
| Transparent, ultra-thin lines | Nozzle too close | Raise Z-offset by 0.05mm |
| Lines don't touch each other (gaps) | Under-extrusion or nozzle too high | Check Z-offset, then flow rate |
| First layer looks good, corners lift later | Thermal shrinkage / no brim | Add brim, raise bed temp |
Remember: the first layer is the foundation for everything above it. Without solid bed adhesion, upper layers have nothing to build on — which is exactly why a 3D printer cannot have floating layers.
The Rule: If the first layer looks wrong, stop the print immediately. Fix the issue first — you'll save filament and hours of wasted time.
10 Fixes for 3D Printer Bed Adhesion Problems (By Severity)
Quick Fixes (Under 2 Minutes)
Fix 1: Clean Your Bed with IPA
What to do: Let the bed cool completely. Wipe it down with a lint-free cloth dampened with 90%+ IPA. For stubborn residue, use warm water with a drop of dish soap, then dry completely.
Why it works: IPA dissolves the invisible oil film from fingerprints and removes dust. This is the single most effective fix for prints not sticking to bed — especially when "it was working fine yesterday."
How often: Before every print if you touch the bed. Deep clean with soap every 5–10 prints.
Fix 2: Adjust Z-Offset (Get Closer)
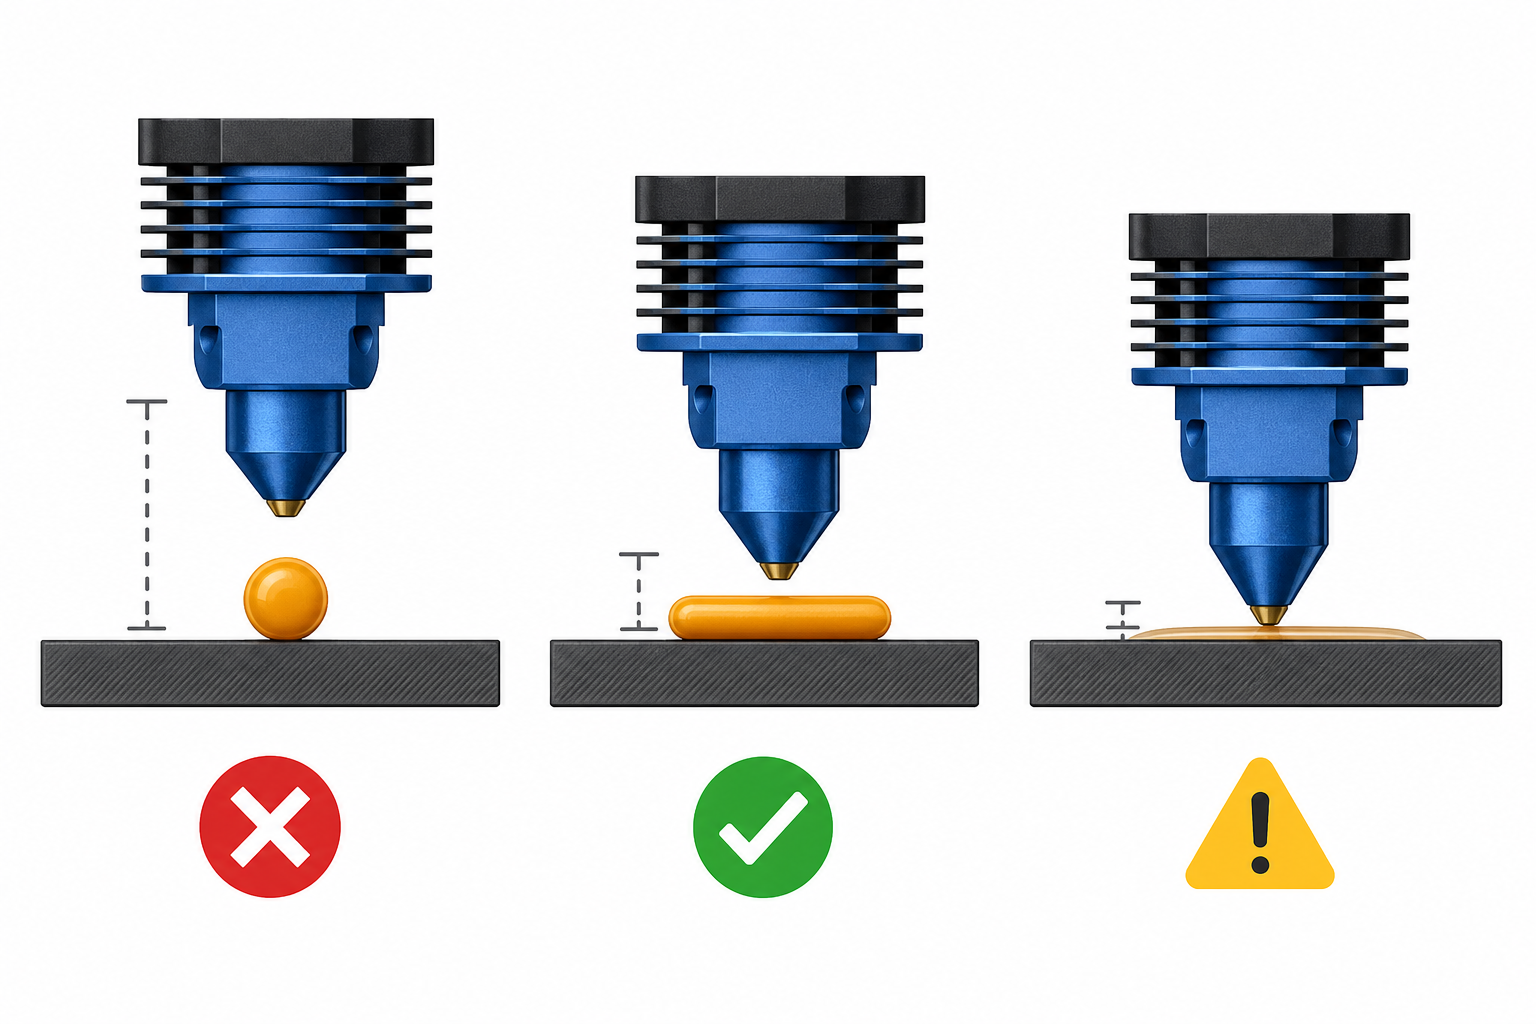
What to do: Lower your Z-offset by 0.05mm increments. Print a single-layer test square and observe:
- Still round beads → go lower
- Flat lines with slight squish → perfect
- Transparent/scratchy → you've gone too far, go back up
Why it works: The ideal gap gives filament enough pressure to spread against the surface and form a strong thermal bond, without being so close that it blocks flow.
Fix 3: Slow Down First Layer to 20mm/s
What to do: In your slicer, find "Initial Layer Speed" or "First Layer Speed." Set it to 20–25 mm/s regardless of your normal print speed.
Why it works: Slower movement gives molten plastic more time to wet the surface and cool in place. Think of it like gluing — you press and hold, not swipe and hope.
Settings Fixes (5 Minutes in Slicer)
Fix 4: Raise Bed Temperature 5–10°C
What to do: Increase bed temp in 5°C steps until adhesion improves. Stay within the safe range for your filament (see material table below).
Why it works: A warmer bed keeps the bottom of your print near its glass transition temperature — soft enough to grip, not so hot that it deforms. This combats filament not sticking to bed in most thermal scenarios.
Fix 5: Turn Off Fan for First 3–5 Layers
What to do: In your slicer's cooling settings, set fan speed to 0% for layers 1–3 (or up to 5 for warp-prone materials). Let it ramp to full speed after that.
Why it works: The cooling fan creates rapid thermal shock on fresh layers, maximizing shrinkage stress. Disabling it briefly lets the foundation set before cooling begins.
Fix 6: Increase First Layer Height and Width
What to do: Set initial layer height to 0.28–0.32mm (even if you're printing at 0.2mm). Set initial line width to 120–150% of nozzle diameter.
Why it works: A thicker, wider first layer has more thermal mass (cools slower) and more surface contact (grips harder). It's also more forgiving of small bed-level imperfections.
Fix 7: Add a Brim (The "Just Make It Stick" Option)
What to do: In your slicer, enable "Brim" with 5–8mm width. This prints a thin, flat border around your part's footprint.
Why it works: A brim dramatically increases the surface area gripping the bed. Even if shrinkage forces try to curl corners, the brim holds everything flat. It peels off easily after printing.
Hardware / Surface Fixes
Fix 8: Apply Glue Stick or Hairspray
What to do: Apply a thin, even layer of PVA glue stick (like Elmer's) or unscented hairspray to the bed. Let it dry before printing.
Why it works: The sticky film gives filament something to grip mechanically. Bonus: for PETG on PEI, glue stick acts as a release agent that prevents permanent bonding and bed damage.
Best for: PLA on glass, PETG on smooth PEI (as protection), ABS on any surface.
Fix 9: Upgrade to PEI or Change Bed Surface
What to do: If you're printing on bare glass or worn-out surfaces, consider upgrading to a PEI spring steel sheet (textured for PETG, smooth for PLA).
Why it works: PEI provides excellent chemical adhesion when hot and releases prints when cool. A flexible steel sheet lets you pop prints off by flexing — no scraping needed.
Fix 10: Use an Enclosure (For ABS/Nylon)
What to do: Print inside a chamber (even a cardboard box works temporarily). Keep the ambient temperature above 35°C for ABS.
Why it works: An enclosure reduces the temperature difference between printed plastic and surrounding air. Less temperature delta = less shrinkage = less warping and peeling. This is essential for 3d printing bed adhesion with ABS, ASA, and Nylon.
Bed Adhesion Settings by Material
Different filaments need different settings. Here's your quick-reference table for solving filament not sticking to build plate:
| Material | Bed Temp | Nozzle Temp (1st Layer) | Fan (1st Layer) | Adhesive | Brim Needed? |
|---|---|---|---|---|---|
| PLA | 60°C | 210–215°C | Off | Usually not (PEI/textured plate) | Only for small parts |
| PETG | 70–85°C | 235–240°C | Off | Glue stick on smooth PEI (as release) | Rarely |
| ABS | 100–110°C | 245–250°C | Off entirely | Optional | Yes + enclosure |
| TPU | 50–60°C | 225–230°C | Off | Optional | Rarely (TPU is flexible) |
| Nylon | 70–90°C | 250–260°C | Off | Glue stick (essential) | Yes + enclosure |
| ASA | 100–110°C | 240–250°C | Off | Optional | Yes + enclosure |
Key insight: PLA not sticking to bed is almost always a cleanliness or Z-offset issue — not a temperature problem. If you're at 60°C and still struggling, clean the bed before raising temp further.
"It Was Working Yesterday" — Why Adhesion Suddenly Fails
This is the most confusing scenario: your printer was fine, nothing changed, and now prints not sticking to build plate out of nowhere. Here's what actually happened:
Invisible Oil Buildup
Every time you touch the bed — removing a print, checking for level, adjusting something — you deposit finger oils. After 5–10 prints without cleaning, the oil layer is enough to break adhesion. Fix: IPA wipe before every print.
PEI Surface Degradation
PEI sheets lose grip gradually over hundreds of prints. The surface becomes "glazed." A regular IPA wipe stops working. Fix: Do a deep clean with warm soapy water and a soft sponge. If that doesn't help, lightly scuff with 2000-grit sandpaper.
Filament Absorbed Moisture
Filament left in open air absorbs water. Wet filament pops, hisses, and produces a rough surface that won't bond properly. You'll hear tiny crackling sounds during extrusion. Fix: Dry your filament (4–6 hours in a filament dryer or oven at 50°C for PLA).
Room Temperature Changed
Moved your printer near a window? AC vent blowing on the bed? Winter dropped your room temp by 10°C? All of these shift the thermal balance. Fix: Move the printer away from drafts, or raise bed temp by 5–10°C to compensate.
Bed Surface Wore Out
PEI sheets, BuildTak, and painter's tape all have finite lifespans. If you see visible scratches, gouges, or bald spots, adhesion will be inconsistent. Fix: Replace the surface.
Bed Adhesion by Printer (Quick Reference)
Your specific printer has a default bed surface that determines which fixes matter most:
Bambu Lab (A1 Mini, P1S, X1C)
- Default surface: Textured PEI plate (or Cool Plate / Engineering Plate)
- Best practice: Clean with IPA. Textured PEI works great for PLA/PETG without adhesive. Use the Engineering Plate for ABS/ASA.
- Common issue: Textured plate loses grip after many prints → soap wash + IPA
Creality Ender 3 / K1 / K2 Plus
- Default surface: Magnetic flexible build plate (textured PEI on newer models, bare or coated steel on older Ender 3)
- Best practice: PEI plate + IPA for PLA. Glue stick for PETG. Older glass beds need glue stick or hairspray for everything.
- Common issue: Bed warping on older Ender 3 → upgrade to a PEI spring steel sheet
Prusa MK4 / Mini
- Default surface: Dual-sided textured/smooth PEI sheet
- Best practice: Textured side for PETG, smooth side for PLA. Always clean with IPA. Use 90%+ concentration.
- Common issue: PETG sticking permanently to smooth PEI → always use textured side or apply a thin layer of glue stick as a separator
Does Higher Bed Temperature Improve Adhesion?
Short answer: yes, but only up to a point — and going too high creates new problems.
Here's why it works: higher bed temperature keeps the bottom of your print close to its glass transition temperature (the point where plastic becomes soft and pliable). Soft plastic grips the surface better than rigid plastic that's trying to shrink.
But there are limits:
| Scenario | What Happens |
|---|---|
| Bed temp too LOW | Plastic cools fast, shrinks, corners lift |
| Bed temp in SWEET SPOT | Plastic stays soft enough to grip, firm enough to hold shape |
| Bed temp too HIGH | "Elephant's foot" (base bulges out), PETG fuses permanently to PEI, PLA goes soft and deforms |
Rules of thumb:
- Raising bed temp 5–10°C above default is safe and often helps
- Going 20°C+ above default usually causes problems
- If you see the bottom of your print bulging outward, your bed is too hot
- PETG + smooth PEI + high temp = permanent bond (use glue stick as separator)
When to Stop Tweaking and Just Use a Brim
Sometimes the smartest fix isn't adjusting settings — it's adding mechanical help. Here's when to stop trying to solve 3d print bed adhesion issues with temperature and cleaning alone:
Use a brim when:
- Your part has a small footprint (tiny contact area with the bed)
- The part is tall and thin (high center of gravity creates leverage)
- You're printing ABS or Nylon (always use a brim + enclosure)
- You've tried all thermal fixes and corners still lift
Don't use a brim when:
- The part has a large, flat base (fix root cause instead)
- You need a perfectly clean edge on the bottom
- The real issue is a dirty bed or wrong Z-offset (brim won't fix that)
Brim vs. Raft:
- Brim (recommended): thin, single-layer border. Easy to remove, minimal waste
- Raft: thick sacrificial platform under the entire print. Use only as a last resort for severely warped beds or parts with tiny contact points
FAQ
What adhesive is used for 3D printing beds?
The most common adhesives are PVA glue sticks (like Elmer's or UHU), unscented hairspray, and specialized 3D printing adhesives like Magigoo or 3DLac. Glue sticks are the easiest for beginners — apply a thin layer, let it dry, and print. For PETG on smooth PEI, glue stick doubles as a release agent that protects your bed surface.
What bed adhesion is best for PLA?
For PLA, a clean PEI surface at 60°C with no adhesive is the gold standard. If you're on glass, use a thin layer of glue stick or hairspray. PLA is the easiest filament for 3d printer bed adhesion — if it's not sticking, the issue is almost always a dirty surface or wrong Z-offset rather than a material problem.
Which has better bed adhesion, PLA or PETG?
PLA generally sticks easier and more reliably to most surfaces. PETG has good adhesion too, but it can be too aggressive — it may bond permanently to smooth PEI surfaces, damaging them. Use textured PEI or a glue stick separator for PETG. Both materials stick well at the right temperature; PETG just needs more careful surface selection.
How to make a 3D printer bed stick?
Start with the basics: clean the bed with IPA, level it properly, and verify Z-offset with the paper test. Then match your bed temperature to your filament. If that's not enough, apply glue stick for extra grip or add a brim in your slicer. These steps solve 3d printing bed adhesion problems for 95% of users.
Why does my 3D print keep detaching from the bed?
Detachment mid-print is usually caused by thermal shrinkage overpowering adhesion. The fix depends on when it happens: if corners lift early, raise bed temp and add a brim. If the whole print pops off hours in, check for drafts, consider an enclosure, and make sure your bed surface isn't worn out. Warping that goes unchecked eventually turns into full detachment.
Does higher bed temperature help adhesion?
Yes, up to a point. Higher bed temperature keeps plastic soft at the base, improving grip. But going too high causes problems: PLA warps above 70°C, PETG fuses permanently to smooth PEI, and you'll see "elephant's foot" where the base bulges outward. Stay within 5–10°C of recommended values for best results.
Why does my 3D print keep falling off the bed?
A print "falling off" means adhesion completely failed. Check these in order: is the bed clean? Is the bed level? Is Z-offset correct? Is the bed temperature right for your material? If all four are good, the bed surface itself may be worn out and need replacing. Also check for environmental factors — a cold room or fan blowing on the printer makes adhesion much harder.
Why is the PLA not sticking to the bed?
PLA is the easiest material to stick, so if it's failing, focus on fundamentals: clean the bed thoroughly with IPA (finger oils are the #1 culprit), verify your Z-offset isn't too high, and confirm bed temp is 55–65°C. If you're on bare glass, add glue stick. On PEI, cleaning alone usually solves PLA not sticking to bed immediately.
Prevention: A Pre-Print Checklist
Tape this near your printer and run through it before every print:
- Bed clean? (IPA wipe, no fingerprints)
- Bed level? (Paper test at 4 corners — or run auto-level)
- Z-offset verified? (Slight squish on first layer, not round beads)
- Bed temp matches material? (PLA 60°C / PETG 75°C / ABS 105°C)
- First layer speed under 25mm/s?
- Fan off for first 3 layers?
- Small part or tricky shape? → Add a brim
- Filament been sitting in open air for weeks? → Dry it first
Follow this list and you'll eliminate 3d printer bed adhesion problems before they start. No more spaghetti.