Why a 3D Printer Cannot Have Floating Layers (And What to Do About It)
3D printers build objects layer by layer — and every layer needs something solid beneath it. Here's why floating layers fail and 5 ways to fix it.
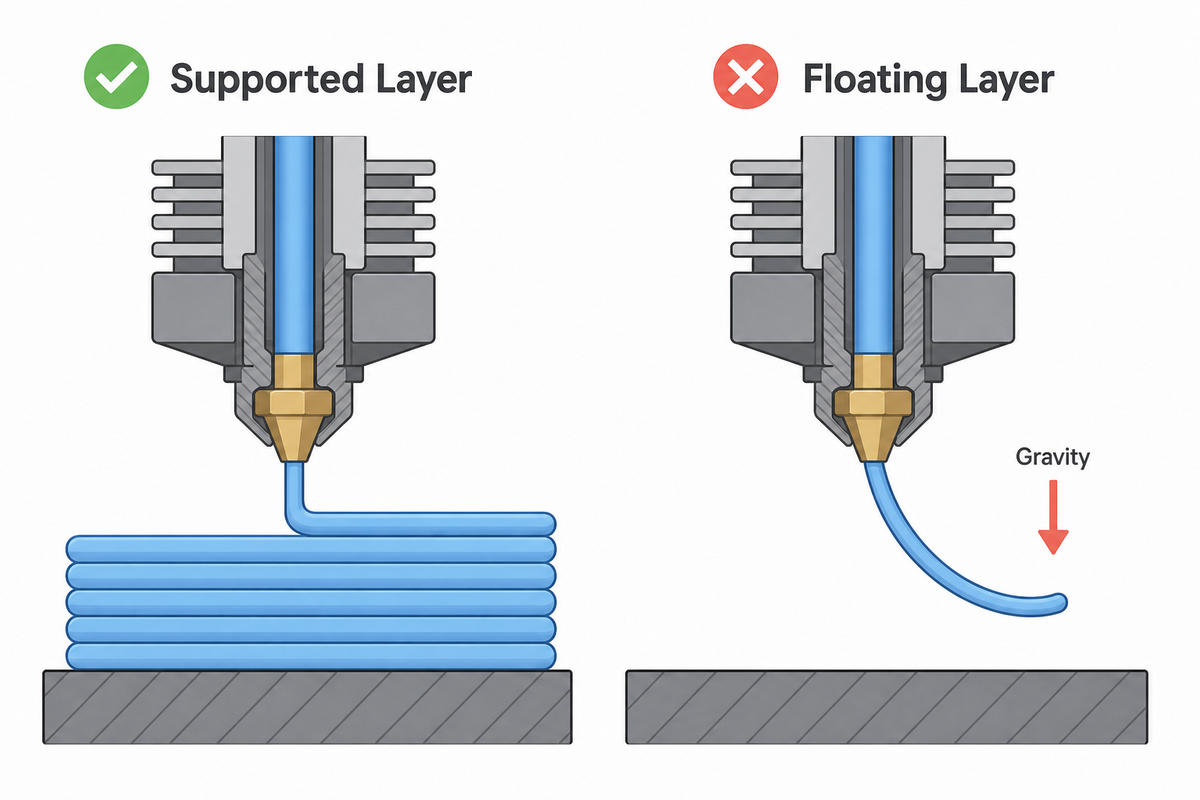
Imagine squeezing a hot glue gun into the air — with nothing to land on. The glue just falls, right? That's exactly what happens inside a 3D printer when it tries to create a layer with nothing beneath it.
This is one of the first surprises for new 3D printer owners: your printer can't just build shapes anywhere in space. Every single layer needs a solid foundation. In this guide, I'll explain exactly why this happens, how to recognize it, and — most importantly — five practical ways to work around it.
What Does "Floating Layer" Mean in 3D Printing?
A "floating layer" is any layer your printer tries to deposit in mid-air, with no solid material beneath it to land on.
To understand why this is a problem, you need to know how FDM 3D printing actually works:
- Your printer melts plastic filament and squeezes it through a tiny nozzle
- The nozzle moves in a precise pattern, laying down one thin layer at a time
- Each new layer is deposited directly on top of the previous layer
- The layers bond together as they cool, building up your object from bottom to top
Think of it like building a brick wall. You place each brick on the row below it. If you tried to place a brick in mid-air with nothing underneath — it would simply fall. A 3D printer has the exact same limitation. A 3D printer cannot have floating layers because there's nothing for the hot plastic to land on, stick to, or cool against.
Why Floating Layers Are Physically Impossible
Gravity Always Wins
When filament comes out of the nozzle, it's in a semi-liquid state — hot, soft, and flexible. At this moment, the only thing keeping it in place is whatever surface it lands on.
If that surface doesn't exist? Gravity takes over instantly. The molten plastic droops, sags, and falls downward. No amount of speed or cooling can fight this on a true floating layer — the material needs somewhere to be.
Think of squeezing toothpaste in the air versus onto a toothbrush. Same material, completely different outcomes.
Each Layer Needs Something to Stick To
Layer bonding in 3D printing requires three things happening simultaneously:
- Contact — The hot filament must touch a solid surface
- Pressure — The nozzle slightly squishes the new filament against the layer below
- Cooling — Heat transfers from the hot filament into the cooler layer below, solidifying the bond
Without a foundation, none of these can happen. There's no surface for contact, no resistance for squishing, and no solid material to conduct heat away. The filament simply has no way to form a stable structure.
The 45-Degree Rule Explained
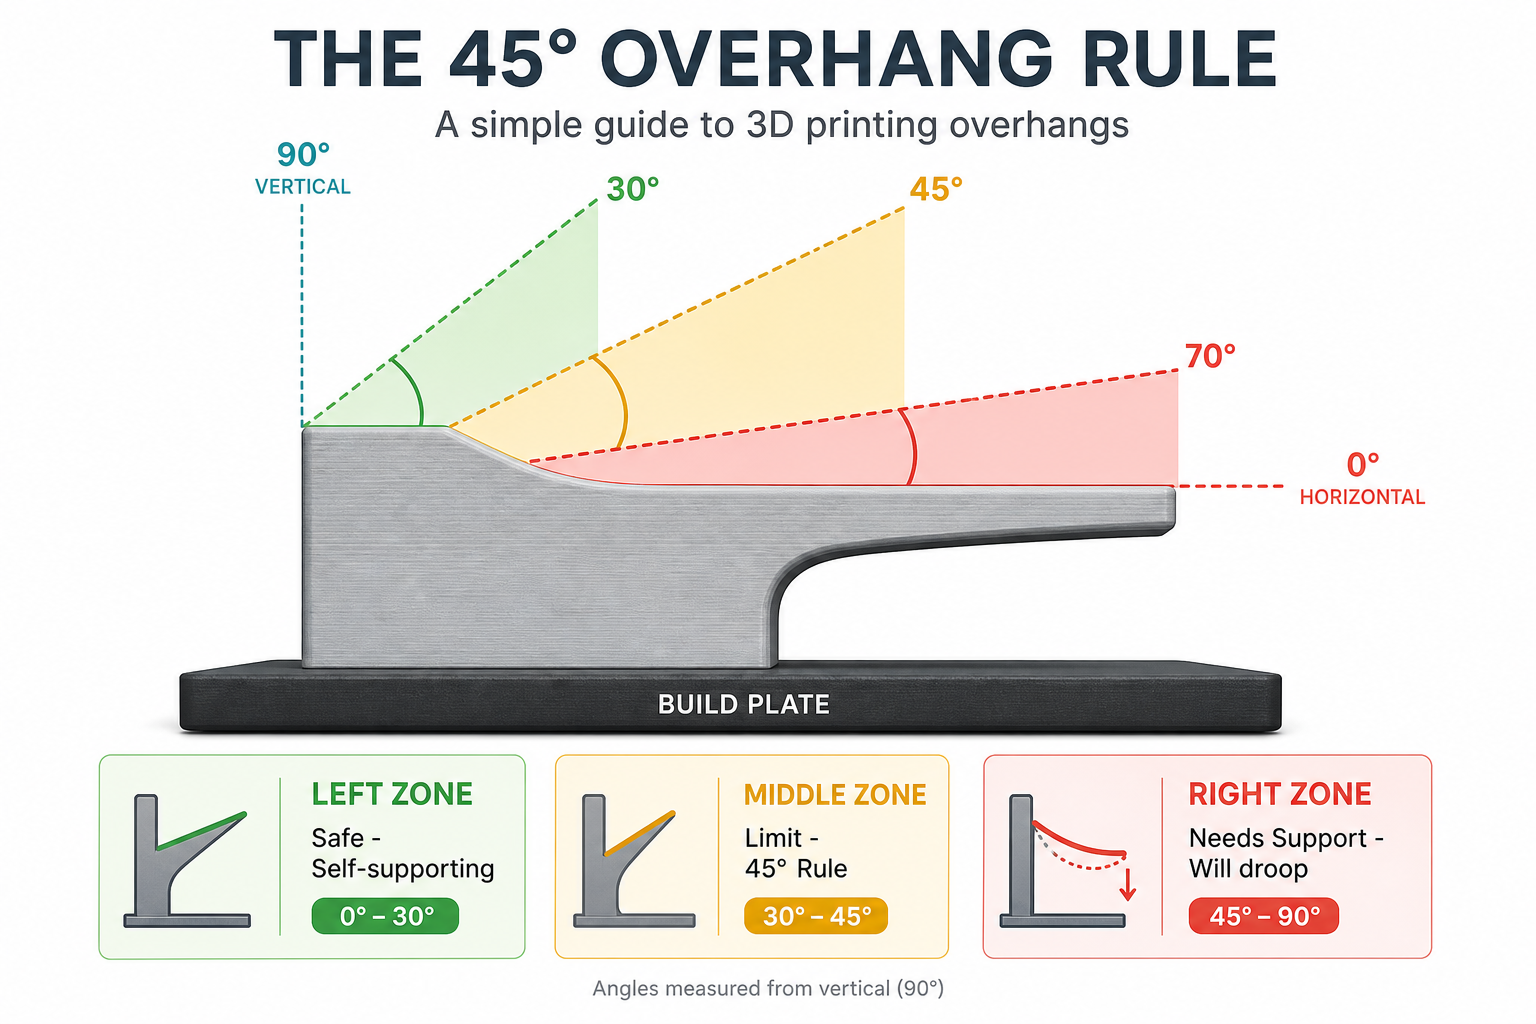
Not every overhang is a floating layer. There's a spectrum between "fully supported" and "printing in thin air," and the magic number is 45 degrees.
Here's how it works:
- 0–30° from vertical (safe): Each new layer has significant overlap with the layer below. Prints fine without any support.
- 30–45° (the limit): Still has about 50% contact with the layer below. Most printers handle this, but quality starts to drop.
- 45–90° (needs support): Contact shrinks rapidly. The filament starts drooping, and by 90° (fully horizontal) you have a true floating layer.
The 45-degree rule isn't perfect for every printer and material, but it's a reliable starting point. When in doubt, add supports above 45°.
What Does a Floating Layer Failure Actually Look Like?
If you're new to 3D printing, you might not immediately recognize a floating layer failure. Here's what to look for:
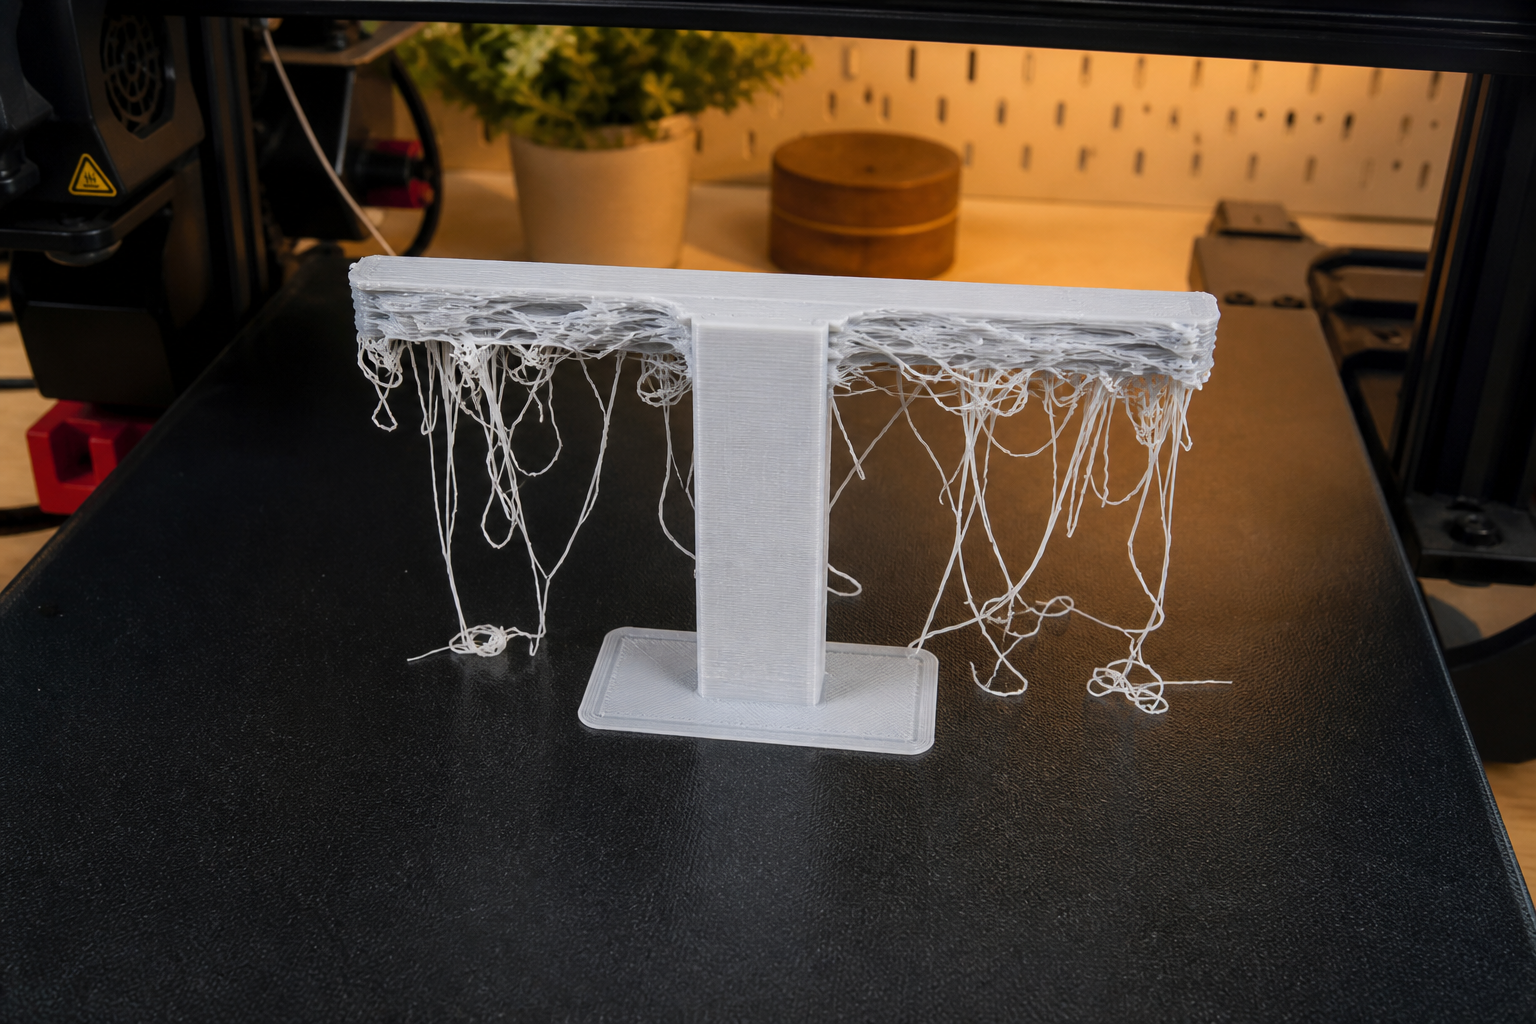
Spaghetti mess. The most dramatic failure — filament extrudes into air and creates a tangled nest of plastic strings hanging from the nozzle. This happens when large sections have absolutely no support.
Droopy underside. On moderate overhangs (50–70°), you'll see the bottom surface of the overhang looks rough, saggy, and uneven — like melted cheese dripping from a pizza slice.
Gaps or missing sections. Sometimes the floating material catches on the nozzle and gets dragged away entirely, leaving holes or missing geometry in your print.
Complete print failure. In the worst case, the failed floating material accumulates on the nozzle, catches on completed sections, and knocks the entire print off the bed — ruining hours of work.
Common Beginner Models That Have This Problem
You don't need exotic designs to encounter floating layers. These everyday models trip up beginners constantly:
T-shaped objects. Any model that looks like the letter "T" has horizontal arms extending into space with nothing below them. Classic floating layer situation.
Character figurines. Outstretched arms, swords, wings, flowing capes — basically any action figure pose that isn't "arms at sides" will have floating geometry.
Text and logos. Letters like H, E, T, F, and A all have horizontal strokes that create floating layer problems when printed upright.
Objects with horizontal holes. A circular hole through the side of a box creates an overhang at the top of the hole — the printer must bridge across the gap or the top will collapse inward.
Architectural models. Roofs, balconies, awnings, and overhanging floors all present floating layer challenges.
If your model has any horizontal feature that extends outward from the main body, you likely have a floating layer issue to solve.
How to Spot Floating Layers Before You Print
The best way to avoid wasted prints is catching the problem before you hit "Start." Here's how:
Step 1: Use your slicer's layer preview. Every major slicer (Cura, PrusaSlicer, Bambu Studio, OrcaSlicer) has a layer-by-layer preview. Load your model, slice it, then scrub through the layers one at a time.
Step 2: Look for "islands." As you advance through layers, watch for sections that appear suddenly with no connection to anything below. These isolated blobs are floating layers — the slicer will try to print them in mid-air.
Step 3: Check overhang coloring. Most slicers color-code overhangs. In Cura, steep overhangs show up in red. In PrusaSlicer, you can enable overhang visualization. Red or orange areas are warning signs.
Step 4: Watch the simulation. Many slicers offer animated print simulation. Watch it play through — any section where the nozzle moves over empty space without visible support below is a floating layer.
Spending 30 seconds in layer preview saves hours of failed prints. Make it a habit before every print.
5 Ways to Print Models with "Impossible" Geometry
Floating layers are a physical limitation, not a dead end. Here are five practical solutions:
1. Enable Support Structures in Your Slicer
This is the most straightforward fix. Support structures are temporary scaffolding that your slicer generates automatically beneath overhangs and floating sections.
How to enable them:
- In Cura: Check "Generate Support" in the right panel
- In PrusaSlicer/OrcaSlicer: Check "Support material" under the Support tab
- In Bambu Studio: Check "Enable support" in the support section
Key settings to adjust:
- Overhang angle: Set to 45° (default in most slicers). Anything steeper gets support.
- Support pattern: "Tree" supports use less material and are easier to remove. "Grid" supports are sturdier for heavy overhangs.
- Z-distance: The gap between support tops and your model. Larger gap = easier removal but rougher surface. Start with 0.2mm.
Tree supports vs. grid supports:
| Feature | Tree Supports | Grid Supports |
|---|---|---|
| Material use | Low | High |
| Removal | Easy (snaps off) | Moderate (needs tools) |
| Surface marks | Minimal | Can leave rough spots |
| Best for | Organic shapes, figurines | Heavy overhangs, flat surfaces |
2. Rotate Your Model to Reduce Overhangs
Sometimes the simplest fix is printing the model in a different orientation.
Example: A T-shape printed upright has massive floating layers on both arms. Flip it upside down — now it's just a flat surface on the bed with a column going up. Zero supports needed.
Try rotating your model in the slicer and look at it from different angles. Ask yourself: "Which orientation puts the least amount of geometry hanging in the air?"
Common rotations that help:
- 45° tilt — Often turns steep overhangs into gentle slopes
- On its side — Horizontal arms become vertical walls
- Upside down — Gravity works with the shape instead of against it
3. Split the Model into Printable Parts
For complex models where no orientation eliminates all floating layers, split the model into separate pieces that each print flat, then glue them together.
When splitting is better than supports:
- Large flat overhangs (like a tabletop) that would need tons of support material
- Figurines with outstretched limbs — print the body, arms, and weapon separately
- Architectural models — print floors individually and stack them
Tools for splitting:
- Bambu Studio / PrusaSlicer: Built-in cut tool (right-click → Cut)
- Meshmixer: Plane Cut tool for precise splits
- Windows 3D Builder: Free and simple for basic cuts
After printing, join pieces with super glue (CA glue) or plastic cement. Sand the joints lightly first for a stronger bond.
4. Use Bridging for Short Gaps
"Bridging" is when your printer stretches filament between two supported points — like a tightrope walker. It's not a true floating layer because both endpoints have solid material; only the span in between is unsupported.
Bridging works for gaps up to ~10–15mm (depending on your printer and material). Beyond that, the filament sags too much.
Settings that improve bridging:
- Fan speed at 100% — Cools the filament instantly as it spans the gap
- Slow print speed — Gives the filament tension time to hold
- Bridge flow reduced to 90–95% — Slightly less material keeps the strand taut
Most slicers detect bridges automatically and apply special settings. But if you notice droopy bridges, tweak these values manually.
5. Redesign with Self-Supporting Geometry
If you're designing your own models (or can modify downloaded ones), you can eliminate floating layers entirely through smart geometry:
Add 45° chamfers. Instead of a sharp 90° overhang, add a 45° angled transition beneath it. This gives each layer enough support from below.
Use teardrop-shaped holes. A circular horizontal hole has a floating layer at the very top (the 12 o'clock position). A teardrop shape — pointed at the top — is fully self-supporting.
Add ribs or gussets. Thin triangular supports designed into the model itself, which become part of the final object and provide internal support during printing.
Does Layer Height Affect Overhang Performance?
Here's a practical tip most guides miss: thinner layers = better overhangs.
When you print at 0.1mm layer height instead of 0.2mm, each new layer has a smaller "step" outward. This means more overlap with the layer below, which means better adhesion and less drooping.
| Layer Height | Overhang Capability | Print Time | Best For |
|---|---|---|---|
| 0.1mm | Excellent | Very long | Prints with complex overhangs |
| 0.16mm | Good | Moderate | Balanced quality/speed |
| 0.2mm | Standard | Fast | Simple shapes, prototypes |
| 0.3mm | Poor | Very fast | No overhangs, draft prints |
The trade-off: Thinner layers mean your print takes much longer. A model that takes 2 hours at 0.2mm might take 4 hours at 0.1mm.
Recommendation: If your model has complex overhangs and you want to minimize supports, drop your layer height to 0.12–0.16mm. It's a good balance between overhang performance and print time.
FAQ
What happens if my 3D printer tries to print a floating layer?
The molten filament extrudes into empty air with nothing to land on. Gravity immediately pulls it downward, creating droopy strings, spaghetti-like tangles, or blobs that accumulate on the nozzle. In mild cases you get a rough underside; in severe cases the entire print fails as tangled material knocks the part off the bed.
Can any 3D printing technology print true floating layers?
SLS (Selective Laser Sintering) comes closest. It uses a bed of powder that naturally supports the entire object as it prints — the surrounding unmelted powder holds everything in place. This means SLS can print almost any geometry without support structures. However, SLS printers are expensive (starting at $5,000+) and mainly used in professional/industrial settings. For hobbyist FDM and resin printers, floating layers are not possible without temporary supports.
Do I always need supports for overhangs?
No. Overhangs under 45° from vertical are generally self-supporting — each layer has enough contact with the layer below to hold its shape. Short bridges (under 10–15mm between two supported points) can also work without supports if you maximize cooling and slow down print speed. Only overhangs steeper than 45° and true floating layers require support structures.
What's the difference between a floating layer and bridging?
A floating layer has nothing beneath it — it starts in empty space with no anchor points. Bridging is different: both ends of the span are anchored to solid material, and the printer stretches filament like a tightrope between them. Bridging can work for short distances (10–15mm) because the tension in the filament holds it up. A floating layer has no tension, no endpoints — just gravity pulling material down.
Summary: The Key Takeaway
A 3D printer cannot have floating layers because it builds objects from the bottom up, one layer at a time, and every layer needs a solid foundation to land on, stick to, and cool against. Without that foundation, gravity wins and the hot plastic falls.
But this isn't a deal-breaker. With the right approach, you can print virtually any shape:
- Supports handle most overhangs automatically
- Rotating your model often eliminates the problem entirely
- Splitting complex models into parts avoids floating layers altogether
- Bridging spans short gaps without support
- Smart design with chamfers and teardrops prevents the issue at the source
The one habit that saves the most failed prints? Always preview your layers in the slicer before printing. Thirty seconds of layer scrubbing catches floating layers before they waste your time and filament.
Now that you understand this fundamental limitation, you'll approach every new print with the right mindset — and your 3D printing journey will have a lot fewer spaghetti surprises.