3D Printer Ironing: What It Does and How to Get Glass-Smooth Top Layers
Ironing is a slicer feature that makes your print's top surface glass-smooth by passing the hot nozzle over it a second time. This guide covers how to enable it, the best settings, and when it's actually worth using.
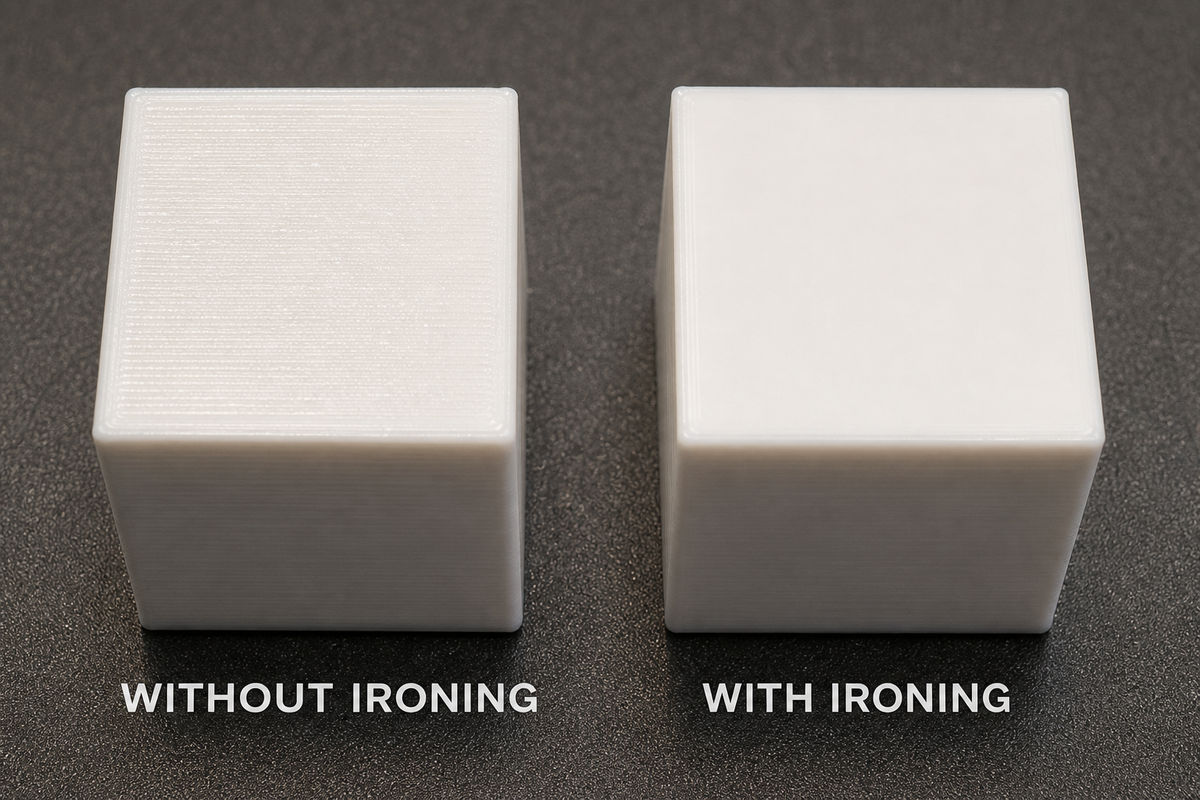
You've printed a box, a nameplate, or a lid, and the top surface has visible lines running across it. It's flat, sure, but it looks obviously 3D printed. There's a one-click slicer setting that fixes this: 3D printer ironing.
Ironing makes your top surfaces look like smooth injection-molded plastic instead of layered filament. It adds minimal time, uses almost no extra material, and works in every major slicer. Here's everything you need to know.
What Is Ironing in 3D Printing?
Ironing is a post-print pass that happens automatically during your print. After the final top layer is deposited normally, the nozzle goes back over that surface a second time at very low flow (almost no plastic coming out). The hot nozzle essentially re-melts and flattens the top layer, smoothing out the tiny ridges between infill lines.
Think of it like running an actual iron over a wrinkled shirt. The heat and pressure flatten everything out. Except here, the "iron" is your printer's nozzle, and the "shirt" is the top surface of your print.
What ironing does NOT do:
- It does not smooth the sides (walls) of your print
- It does not fix layer lines on vertical surfaces
- It does not add structural strength
- It does not work on overhangs or curved top surfaces (more on this later)
Ironing only affects flat or near-flat top surfaces. For everything else, you'll need sanding or other post-processing.
What Does Ironing Actually Do to Your Print?
The difference is visible to the naked eye. Without ironing, the top surface shows parallel lines where the infill pattern meets the perimeter walls. With ironing enabled, that same surface becomes uniformly smooth with almost no visible texture.
Before ironing: You can feel ridges with your fingernail. Light catches the lines at certain angles, making the surface look uneven.
After ironing: The surface feels flat like a credit card. Light reflects evenly. The print looks manufactured rather than printed.
The improvement is most dramatic on:
- Flat lids and covers
- Nameplates and signs
- Box tops
- Any surface printed at 0 degrees (perfectly horizontal)
On surfaces with even a slight angle (5+ degrees), ironing becomes less effective and can sometimes make things worse by creating uneven buildup at the edges.
3D Printer Ironing Settings Explained
Every slicer offers the same core settings for ironing. Here's what each one controls:
Flow Rate (10-15%)
This is the percentage of normal extrusion that comes out during the ironing pass. The nozzle isn't printing a new layer. It's barely oozing plastic, just enough to fill micro-gaps.
- Too low (under 10%): Gaps and voids remain unfilled
- Sweet spot (10-15%): Smooth finish without excess
- Too high (over 20%): Blobs, over-extrusion, messy surface
Start with 10% for PLA. Increase to 15% if you see tiny holes or gaps in the ironed surface.
Speed (10-20 mm/s)
How fast the nozzle moves during the ironing pass. Slower gives better results because the nozzle has more time to melt and flatten the surface.
- 10 mm/s: Best quality, slowest
- 15 mm/s: Good balance for most prints
- 20 mm/s: Acceptable quality, faster
Going above 20 mm/s defeats the purpose. The nozzle moves too fast to properly smooth anything.
Line Spacing (0.1-0.2 mm)
The gap between each ironing pass line. Smaller spacing means more overlap between passes, which produces a smoother result but takes longer.
- 0.1 mm: Maximum smoothness (each pass overlaps significantly)
- 0.2 mm: Standard, good results
- 0.4 mm: Faster but less smooth (diminishing returns)
For most prints, 0.1 mm gives the best result without adding much time.
Ironing Pattern: Rectilinear vs Concentric
This determines the direction the nozzle travels during ironing.
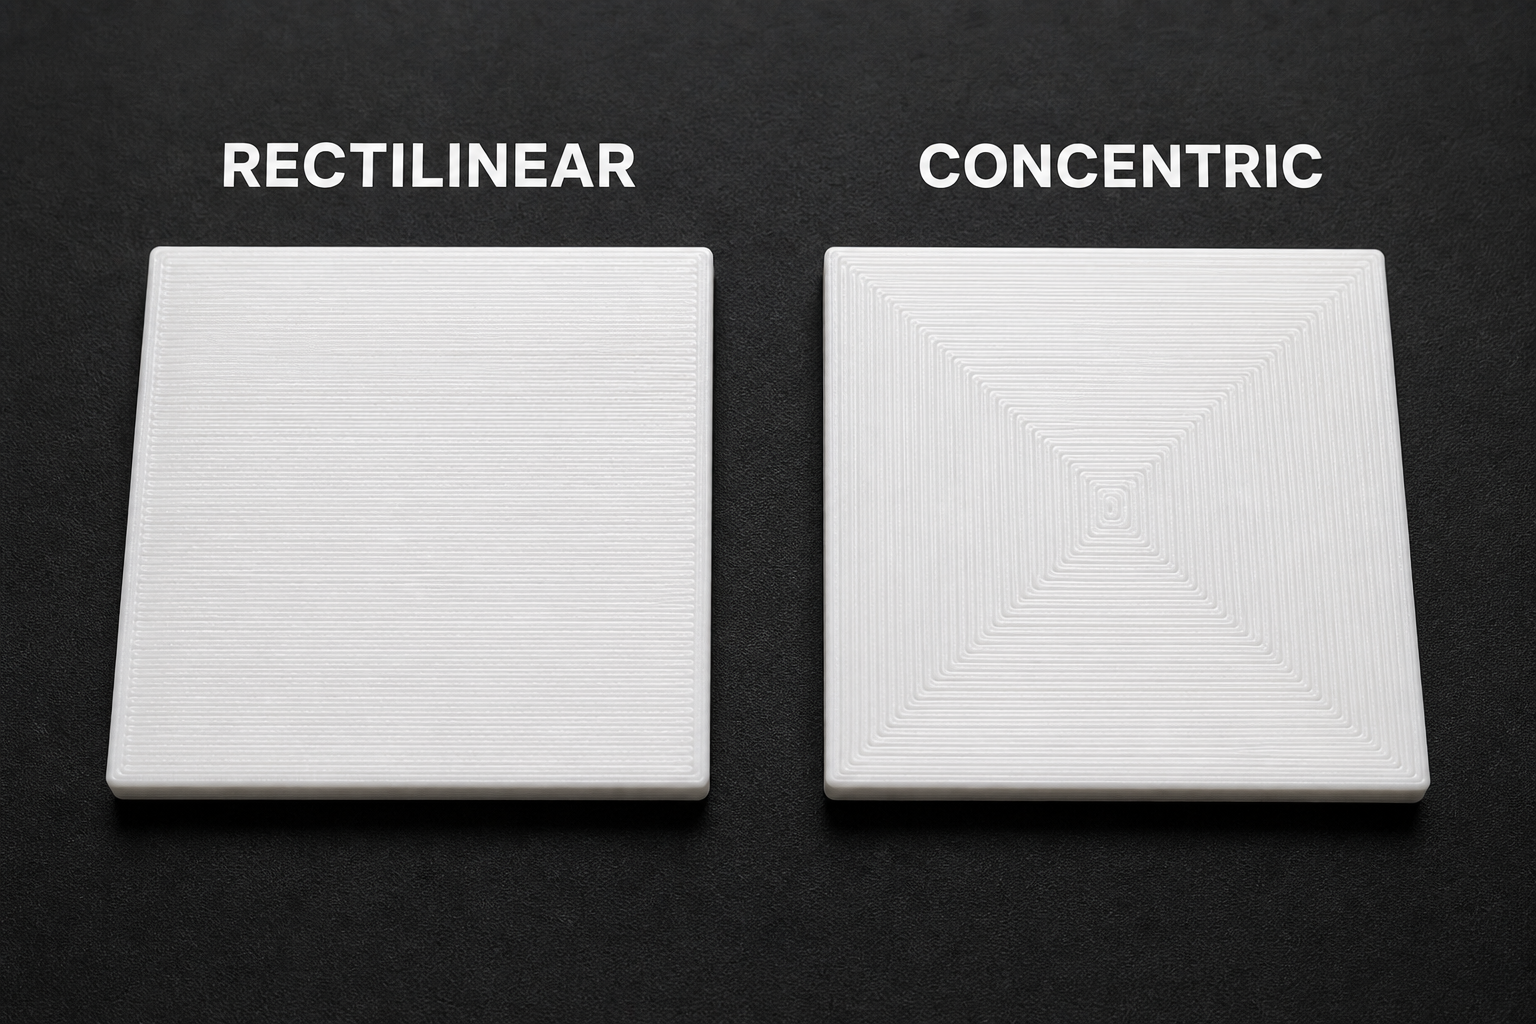
Rectilinear (default, recommended): The nozzle moves in straight parallel lines across the surface. Produces a uniform brushed finish. Works well on rectangular and irregular shapes. This is the right choice 90% of the time.
Concentric: The nozzle follows the perimeter shape inward in rings, spiraling toward the center. Looks best on circular shapes (cylinder tops, round lids). Can leave a visible dot in the center where the spiral ends.
When to use concentric: Round or oval top surfaces only. For everything else, stick with rectilinear.
How to Enable Ironing in Your Slicer
Bambu Studio Ironing (and OrcaSlicer)
- Open your model in Bambu Studio
- Go to Quality section in the process settings
- Scroll down to find Ironing (or search "ironing" in the settings search bar)
- Check Enable ironing
- Set Ironing type: "All top surfaces" (safest) or "Topmost surface only" (fastest)
- Adjust settings: Flow rate 10%, Speed 15 mm/s, Spacing 0.1 mm
- Slice and check the preview. Ironing shows as a distinct pass on top layers.
OrcaSlicer uses the same interface since it's based on Bambu Studio's code.
Cura Ironing Settings
- Open your model in Cura
- In the right settings panel, search for "ironing"
- Enable Iron Top Surface
- Set Ironing Pattern: Zig Zag (rectilinear)
- Set Ironing Line Spacing: 0.1 mm
- Set Ironing Flow: 10%
- Set Ironing Speed: 15 mm/s
- Slice and verify in preview
The ultimate Cura ironing surface comes from combining 0.1 mm line spacing with 10% flow. Don't go higher on flow unless you see gaps.
PrusaSlicer Ironing
- Open your model in PrusaSlicer
- Go to Print Settings tab
- Navigate to Infill section
- Check Enable ironing
- Set Ironing type: All top surfaces
- Set Flow rate: 10%
- Set Spacing between ironing passes: 0.1 mm
- Slice and preview
PrusaSlicer ironing works identically to Bambu Studio since they share the same codebase origin.
When Should You Use Ironing (and When to Skip It)
Use ironing when:
- Your print has a visible, flat top surface (boxes, lids, signs, nameplates)
- You're printing a gift or display piece where surface quality matters
- The model has large flat areas on top that will catch light
- You don't want to sand the top surface afterward
Skip ironing when:
- The model has no flat top surfaces (organic shapes, characters, figures)
- The top surface will be hidden (inside an assembly, bottom of a stacked part)
- You're printing 3D printing ironing curved surface areas. Ironing performs poorly on slopes and curves because the nozzle can't maintain consistent contact. On anything steeper than about 10 degrees, it tends to create messy edges rather than smoothing.
- Speed is your priority and you don't care about cosmetic finish
- The model has very thin top surfaces (under 2 layers). Ironing can push thin features around.
Does Ironing Every Layer Do Anything?
Most slicers give you three options for which layers get ironed:
- Topmost surface only: Irons only the very last top layer. Fastest, least material.
- All top surfaces: Irons any layer that is a "top" layer (exposed from above). This includes intermediate surfaces in multi-level models.
- Every layer / All solid layers: Irons literally every solid layer, including those covered by more layers above.
Recommendation: "All top surfaces" for most prints.
"Every layer" is almost never useful. Ironing a layer that will be covered by another layer on top is wasted time. The smoothness gets immediately hidden. The only edge case: if you're printing something transparent or translucent where inner-layer smoothness might affect light diffusion.
How Much Time Does Ironing Add?
Ironing is faster than you'd expect:
| Print Size | Typical Ironing Time Added |
|---|---|
| Small (5×5 cm top) | 2-5 minutes |
| Medium (10×10 cm top) | 5-10 minutes |
| Large (20×20 cm top) | 10-20 minutes |
For context: a Benchy takes about 20 minutes longer with ironing enabled on the deck surfaces. A 10cm cube adds roughly 8 minutes.
Ironing vs sanding comparison:
- Ironing: automated, no effort, perfect for flat tops, adds 5-15 min to print
- Sanding: manual, 20-40 min of work, works on all surfaces including curves and walls
- Best practice: use ironing for top surfaces, sand the walls if needed
The two approaches complement each other rather than competing.
Troubleshooting Common Ironing Problems
Blobs or Over-Extrusion on Surface
Cause: Ironing flow rate too high (above 15%), or retraction settings not tuned.
Fix: Reduce ironing flow to 10%. Ensure retraction is enabled and working normally. If blobs appear at the start/end of ironing passes, increase retraction distance by 0.5 mm.
Uneven or Streaky Finish
Cause: Ironing speed too fast, or line spacing too wide.
Fix: Slow ironing speed to 10 mm/s. Reduce line spacing to 0.1 mm. Also check that your nozzle isn't partially clogged. A dirty nozzle creates inconsistent flow during the low-extrusion ironing pass.
Edge Buildup (Ridges at Perimeter)
Cause: When the ironing pass reaches the edge of the top surface, excess material can pile up against the perimeter wall.
Fix: Increase the "ironing inset" setting (distance from edge where ironing stops). A value of 0.2-0.5 mm keeps the ironing pass away from the perimeter, preventing buildup.
Ironing Makes Curved Surfaces Worse
Cause: Ironing is designed for flat horizontal surfaces. On slopes, the nozzle can't maintain proper distance, creating streaks and blobs.
Fix: Don't iron angled surfaces. In Bambu Studio/OrcaSlicer, set ironing to "Topmost surface only" to avoid ironing intermediate sloped layers. Some slicers let you set a maximum angle for ironing (e.g., only iron surfaces flatter than 10 degrees).
Nozzle Dragging or Scratching
Cause: Z-offset or first layer calibration is slightly too close, or the previous layer is slightly over-extruded.
Fix: Calibrate your Z-offset. Reduce regular flow rate by 2-3% to prevent the top layer from being slightly too thick before ironing.
Best 3D Printer Ironing Settings for PLA
Here's a quick-reference settings table specifically for PLA (the most common filament for ironing):
| Setting | Recommended Value |
|---|---|
| Enable ironing | Yes |
| Ironing type | All top surfaces |
| Pattern | Rectilinear |
| Flow rate | 10% |
| Speed | 15 mm/s |
| Line spacing | 0.1 mm |
| Inset from edge | 0.2 mm |
These settings work as a starting point for any filament type, but PLA responds best because it melts at a lower temperature and flows predictably during the low-extrusion ironing pass. PETG works too but may need flow reduced to 8% to avoid stringing.
FAQ
Is ironing worth it for 3D printing?
Yes, if your model has flat top surfaces that people will see. Ironing adds only a few minutes to print time and makes a dramatic visible difference on boxes, lids, nameplates, and any horizontal surfaces. If your print has no flat tops (like an organic sculpture or character model), ironing won't help and you can leave it off.
What is ironing on a 3D printer?
Ironing is an automatic slicer feature where the hot nozzle passes over finished top surfaces a second time with almost no plastic coming out. The heat re-melts the surface and the nozzle physically flattens it, removing the tiny ridges that normally appear between infill lines. You enable it in your slicer settings and it runs automatically during the print.
What are the best ironing settings for PLA?
Start with: Flow rate 10%, Speed 15 mm/s, Line spacing 0.1 mm, Pattern Rectilinear. These settings work well across all slicers (Bambu Studio, Cura, PrusaSlicer, OrcaSlicer). If you see tiny gaps in the ironed surface, increase flow to 12-15%. If you see blobs, decrease flow to 8%.
Is ironing necessary for 3D printing?
No, it's entirely optional. Many prints don't need it at all, especially those with no visible flat surfaces on top, or functional parts where cosmetic finish doesn't matter. Think of ironing as a free upgrade for prints where the top surface quality is important to you. You can always print without it and decide later if you wish the top had been smoother.
Can a 3D printer iron PETG or ABS?
Yes. Ironing works on any thermoplastic filament. For PETG, reduce flow to 8-10% (PETG is stringing-prone and extra flow makes it worse). For ABS, standard PLA settings work fine since ABS melts predictably. The biggest difference is that PLA gives the cleanest ironing results due to its smooth flow characteristics.
How do I fix ironing that looks worse than no ironing?
The most common causes: flow rate too high (reduce to 10%), ironing over non-flat surfaces (disable for curved areas), or a partially clogged nozzle (clean or replace). Try a small test cube with ironing before committing to a large print. If the test cube looks smooth, the settings are correct.
Want to understand more about how your FDM printer builds layers? Or dealing with other surface issues like warping? Check our beginner guides for step-by-step help.