3D Printing Raft: What It Is, When to Use It, and How to Set It Up
A raft is a temporary multi-layer platform printed beneath your model to prevent warping and improve bed adhesion. This guide covers when to use one, how to configure raft settings, and how to remove it cleanly.
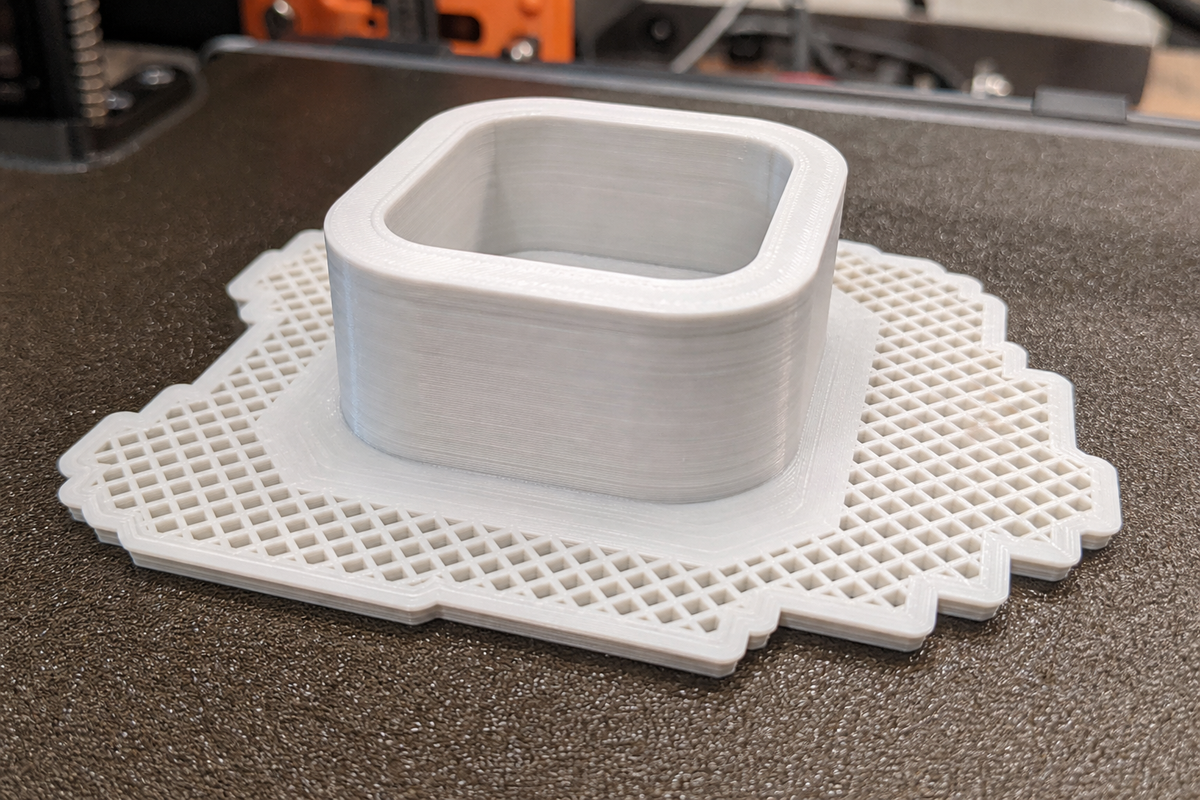
Your print keeps peeling off the bed, the brim isn't cutting it, and you've already cleaned the plate twice. That's when a 3D printing raft earns its place.
A raft is the strongest bed adhesion tool your slicer offers. It solves problems that brims and glue sticks can't. But it also adds print time, uses extra filament, and leaves a rougher bottom surface. This guide helps you decide when a raft is worth it, how to configure it properly, and how to peel it off without damaging your print.
What Is a Raft in 3D Printing?
A raft is a temporary, sacrificial platform printed directly on the build plate before your model starts. Your model then prints on top of the raft instead of on the bed itself.
Think of it like laying down a flat foundation before building a house. The raft absorbs all the challenges of sticking to the bed, and your model gets a stable, level surface to build on.
A typical 3D printer raft has three distinct layers:
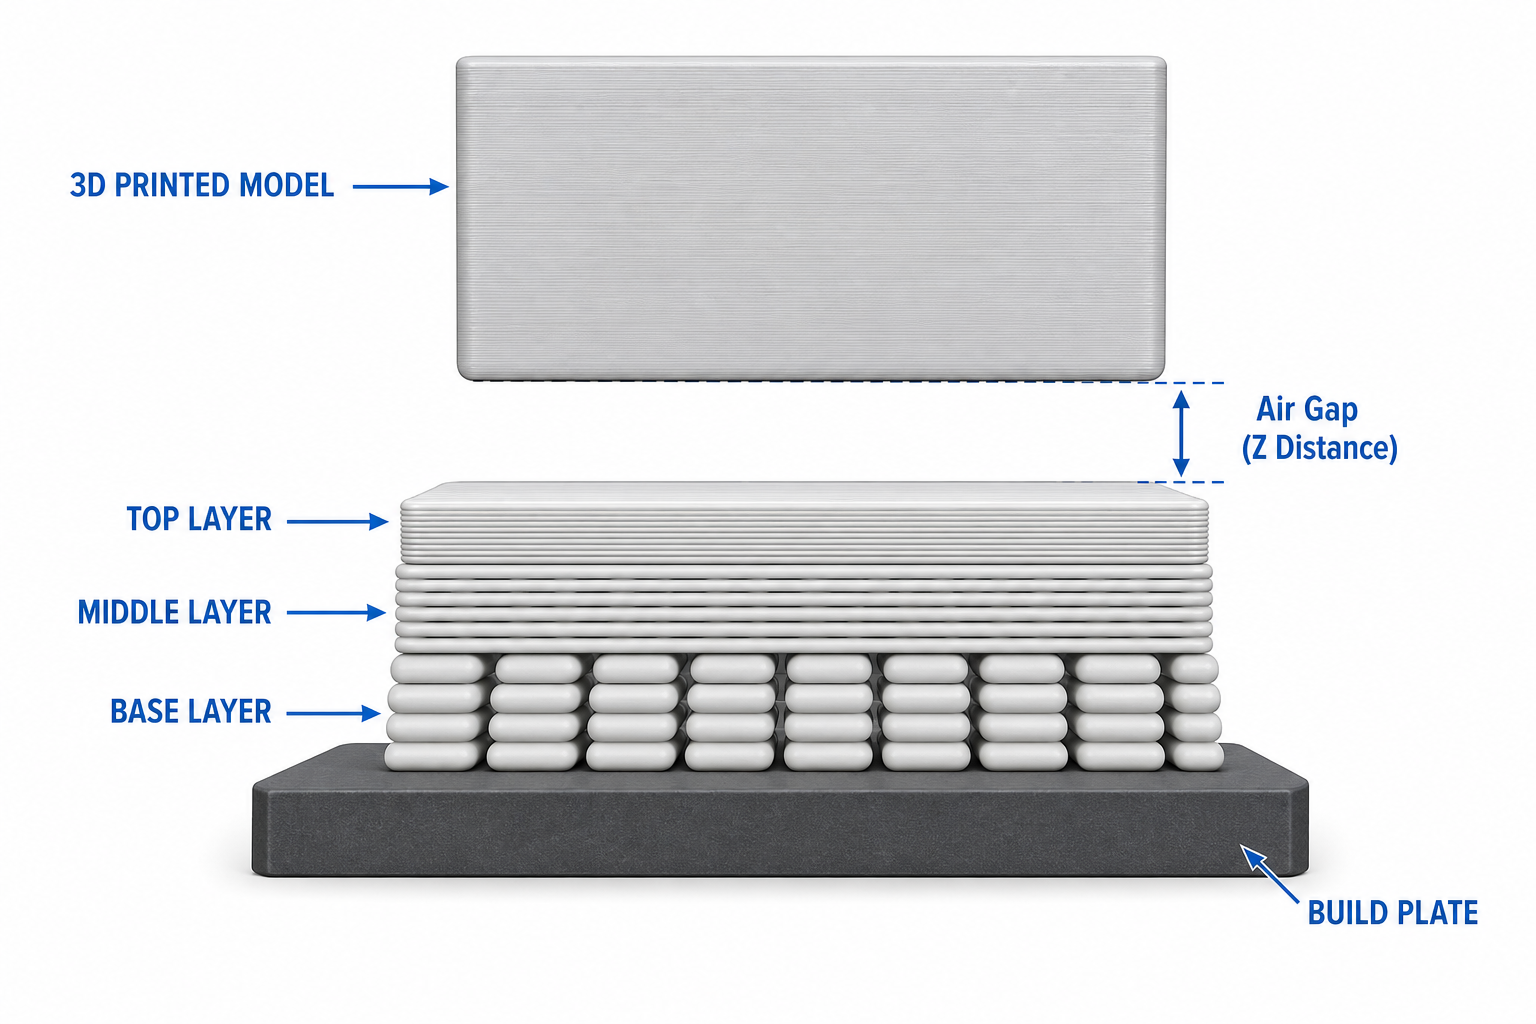
Base layer: Thick, wide lines printed slowly to bond firmly to the bed. This is what actually grips the build plate.
Middle layer(s): Adds structural rigidity and height. Usually 1-2 layers with a medium line width.
Top layer(s): Thin, closely-spaced lines that create a smooth surface for your model to print on. The smoother this layer, the better your model's bottom surface will look.
Between the top of the raft and the bottom of your model, there's a small air gap (called the "contact Z distance"). This gap is what allows you to separate the raft from the print after it's done.
Skirt vs Brim vs Raft: Which One Do You Need?
These three adhesion tools solve different levels of the same problem. Here's how they compare:
Side-by-side comparison of skirt, brim, and raft bed adhesion methods
| Feature | Skirt | Brim | Raft |
|---|---|---|---|
| Touches model? | No | Yes (edge only) | Yes (entire base) |
| Adhesion help | None | Moderate | Maximum |
| Material use | Minimal | Low | High |
| Print time added | Seconds | 1-3 minutes | 5-15 minutes |
| Bottom surface | Unaffected | Minor edge marks | Rough/textured |
| Removal difficulty | N/A | Easy | Moderate |
Quick decision guide:
- Model sticks fine on its own → Skirt (just for nozzle priming)
- Corners lifting or small base → Brim (first thing to try)
- Brim doesn't work, heavy warping, or uneven bed → Raft (the heavy artillery)
The key difference between raft vs brim: a brim only extends outward from the edges, while a raft goes completely underneath the entire model. This means a raft provides support across the full base, not just at the perimeter.
When to Use a 3D Printing Raft
A raft is your best option in these specific situations:
Warping-prone materials. ABS, ASA, and Nylon contract significantly as they cool. A raft creates a thermal buffer between the hot bed and your model, reducing the temperature differential that causes warping. The raft warps instead of your model.
Very small contact area. Models with tiny feet, pointed bases, or thin legs have almost no surface touching the bed. A raft gives them a full platform to grip.
Uneven or damaged build plate. If your bed has scratches, dents, or a slight warp that can't be fully compensated by mesh leveling, a raft can bridge those imperfections and still provide a flat starting surface.
When everything else has failed. You've tried a brim, cleaned the bed, adjusted Z-offset, applied glue stick, and the print still won't stay down. Raft is the last resort and it almost always works.
When bottom appearance doesn't matter. If the bottom of your model will be hidden (like a wall-mounted item or a functional bracket), the rough raft texture is irrelevant.
When to Skip the Raft
Don't use a raft by default. It should be a targeted solution, not a habit.
PLA on a clean PEI plate. PLA is the least warping-prone filament type and sticks well to PEI without any help. Adding a raft just wastes time and material.
Large, flat-based models. If your model already has a wide, stable footprint, it doesn't need extra adhesion. The large surface area does the work.
When bottom surface finish matters. Rafts leave a rough, textured pattern on the bottom of your model. If you need a smooth base (display pieces, mating surfaces), avoid the raft or be prepared to sand.
Batch printing for speed. Rafts add 5-15 minutes of print time and several grams of filament per print. For production runs, this adds up quickly.
When a brim solves the problem. Always try a brim first. It uses less material, prints faster, and removes cleaner. Only escalate to a raft if the brim isn't enough.
How to Add a Raft in Your Slicer
How to Add a Raft in Bambu Studio
- Open your model in Bambu Studio
- Go to the Process settings panel (right side)
- Click Others tab
- Under Brim type, select No brim (you don't need both)
- Scroll down to find the Raft section or search "raft" in the search bar
- Check Enable raft
- Adjust raft layers and contact Z distance as needed
- Slice and verify in preview that the raft appears beneath your model
How to Make a Raft in PrusaSlicer
- Open your model in PrusaSlicer
- Go to Print Settings → Support material
- Under the Raft section, set Raft layers to a value greater than 0 (typically 3-4)
- Adjust Contact Z distance (start with 0.2 mm)
- Set Raft expansion to control how far the raft extends beyond the model (3-5 mm)
- Slice and check the preview
PrusaSlicer's raft is configured through the support material tab because it's technically an extension of the support system.
How to Add a Raft in Cura
- Open your model in Cura
- In the right panel, find Build Plate Adhesion
- Set Build Plate Adhesion Type to Raft
- Key settings that appear:
- Raft Air Gap (default 0.3 mm)
- Raft Top Layers (default 2)
- Raft Base Thickness
- Slice and verify in layer preview
3D Printing Raft Settings Explained
Getting a raft to work well is all about tuning these settings:
Raft Contact Z Distance (Air Gap)
This is the single most important raft setting. It controls the vertical gap between the top of the raft and the bottom of your model.
- Too small (< 0.1 mm): The raft fuses to your model and becomes nearly impossible to remove without damage
- Too large (> 0.4 mm): Your model doesn't bond to the raft at all and shifts or detaches mid-print
- Sweet spot for PLA: 0.15 to 0.25 mm
- Sweet spot for ABS: 0.20 to 0.30 mm
- Sweet spot for PETG: 0.20 to 0.30 mm (PETG is sticky, err toward larger gap)
If you're new to rafts, start with 0.2 mm and adjust from there based on how easy removal is.
Raft Layers: How Thick Should a Raft Be?
A raft doesn't need to be thick. More layers means more material and time without meaningful benefit beyond a point.
| Layer Type | Recommended Count | Purpose |
|---|---|---|
| Base | 1-2 layers | Grips the build plate (strongest adhesion) |
| Middle | 1-2 layers | Provides a structural transition between base and top |
| Top | 2-3 layers | Creates a smooth contact surface for the model |
| Total | 4-7 layers | Full Raft structure |
For most prints, the default raft thickness in your slicer (usually 4-5 total layers) is fine. Only add more top layers if you want a smoother model bottom surface.
Raft Speed and Temperature
The base layer of the raft should print slow (15-25 mm/s) to ensure it bonds firmly to the bed. Upper raft layers can print at normal speed.
Temperature: Use your normal first-layer bed temperature for the raft. No special adjustment needed.
Raft Margin (Expansion)
How far the raft extends beyond the edges of your model. Typical values:
- 3-5 mm: Standard, provides enough overlap for stability
- 5-10 mm: Use for very warping-prone prints or uneven beds
- 1-2 mm: Minimal, saves material but offers less protection at edges
How to Remove a Raft Cleanly
Removing a 3D print raft requires patience. Rushing it causes damage.
Step 1: Let it cool completely. PLA: wait until the plate reaches room temperature. ABS: wait until below 50°C. The raft contracts slightly as it cools, making separation easier.
Step 2: Flex the build plate (if removable). A slight bend is often enough to pop the raft loose from the bed. Then work on separating the model from the raft.
Step 3: Find an edge. Use a thin spatula, putty knife, or the flat edge of a craft knife. Slide it between the model and the raft at a corner where access is easiest.
Step 4: Work slowly at a low angle. Keep the tool nearly parallel to the bottom surface. Don't pry upward aggressively or you'll gouge the model's base.
Step 5: Clean up. Some raft residue may remain on the bottom. Light sanding with 200-400 grit sandpaper removes it quickly. For functional parts where appearance doesn't matter, you can skip this step.
If the raft won't come off: Your Z distance is too small. Increase it by 0.05 mm and reprint. Don't force it off a finished print; you'll likely damage the model.
Common Raft Problems and Fixes
Raft Lifting Off the Bed
The raft itself is peeling up from the build plate.
Fixes:
- Clean the bed (IPA wipe)
- Increase bed temperature by 5°C for the first few layers
- Slow down raft base speed to 15-20 mm/s
- Apply glue stick or hairspray to the bed
- Check bed leveling / Z-offset
This is fundamentally a bed adhesion problem, not a raft-specific issue.
Model Not Sticking to the Raft
The raft prints fine, but your model shifts or detaches from it.
Fixes:
- Decrease raft contact Z distance by 0.05 mm
- Add more raft top layers (3-4) for a smoother bonding surface
- Slow down the first model layer printed on the raft
- Increase flow rate for the first layer above the raft by 5-10%
Raft Impossible to Remove
The raft fuses permanently to the bottom of your model.
Fixes:
- Increase raft contact Z distance by 0.05-0.10 mm
- Reduce flow/extrusion multiplier slightly (95-98%)
- For PETG specifically: use a larger gap (0.25-0.35 mm) because PETG bonds aggressively
- Allow full cooling before attempting removal
Rough Bottom Surface After Raft Removal
This is expected behavior, not a bug. The model's bottom surface inherits the texture of the raft's top layer.
Minimize it by:
- Adding more raft top layers (3-4 gives smoother contact)
- Reducing top layer line width
- Post-processing: sand with 200 grit, then 400 grit for a clean finish
FAQ
Should I use a raft for 3D printing?
Only when simpler options (brim, glue stick, proper bed leveling) aren't enough. Rafts are best for warping-prone materials like ABS, models with tiny contact areas, or beds that aren't perfectly flat. For PLA on a clean PEI plate, you almost never need a raft.
What is a raft in 3D printing?
A raft is a temporary multi-layer platform that prints on the build plate before your model. Your model then builds on top of the raft instead of directly on the bed. It provides maximum adhesion and a level surface, then gets peeled off and discarded after printing.
How thick should a raft be for 3D printing?
A total of 4-7 layers is typical: 1-2 base layers for bed grip, 1-2 middle layers for structure, and 2-3 top layers for a smooth model contact surface. Most slicer defaults work well. Only increase top layers if you need a smoother model bottom.
What is raft contact Z distance?
The vertical air gap between the top of the raft and the bottom of your model. It determines how easily the raft separates after printing. For PLA, 0.15-0.25 mm works well. Too small and the raft fuses to your model; too large and the model won't stick to the raft during printing.