3D Printer Tools: Everything You Need to Get Started
A prioritized guide to 3D printer tools organized by what to buy first, what to add later, and what you can print yourself for free. Covers essentials, post-processing, maintenance, safety, and 3D printable tool organizers.
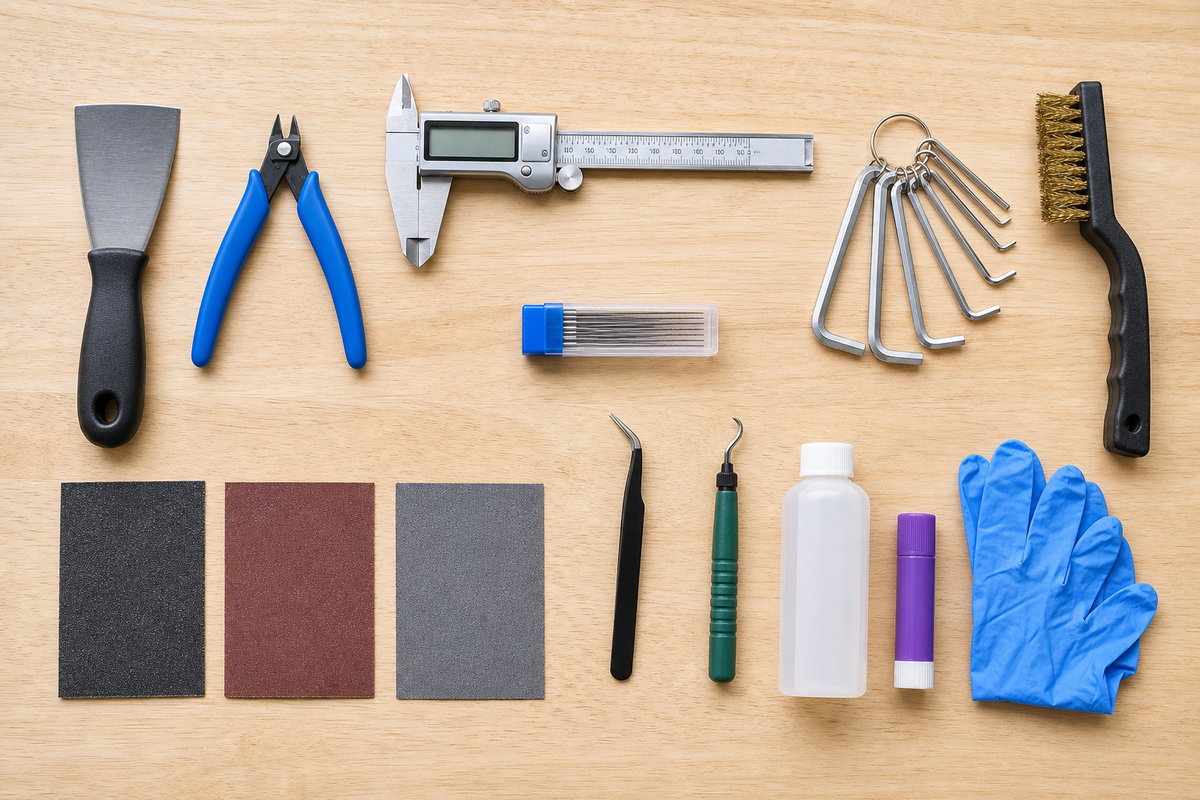
Your 3D printer does the heavy lifting, but the right 3d printer tools make the difference between frustrating cleanup sessions and smooth, professional results. The good news for beginners: you do not need to buy everything at once, and you probably already own some of these items.
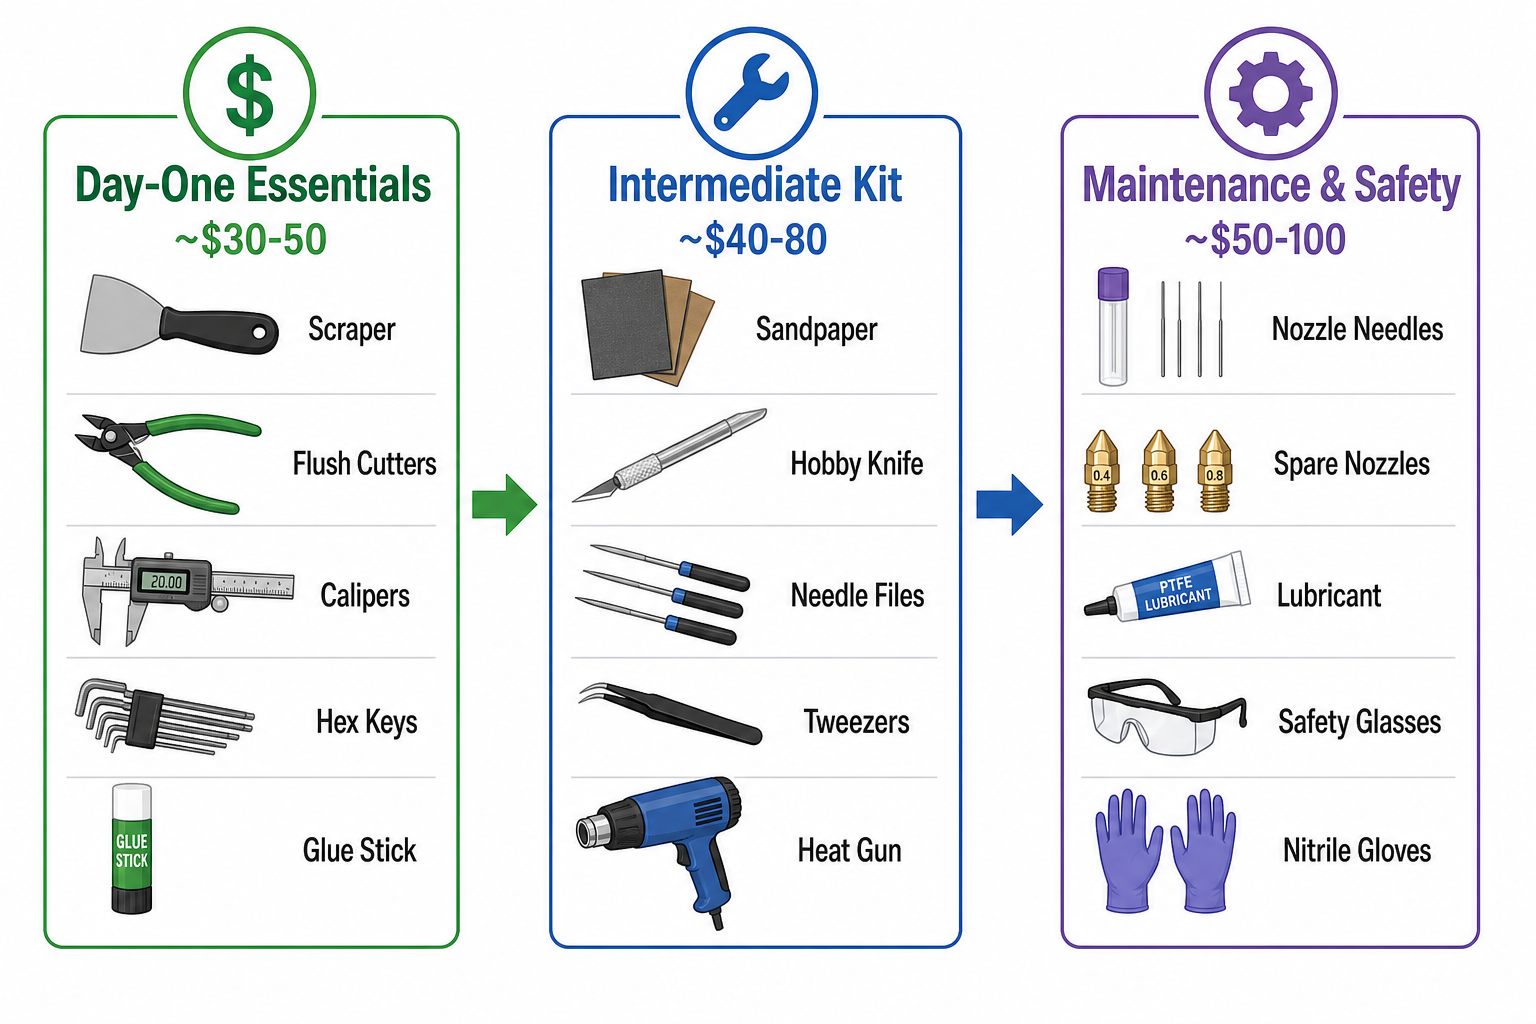
This guide organizes tools into clear priority tiers. Start with the day-one essentials, add post-processing and maintenance tools as your skills grow, and print some of your own tool organizers for free along the way.
3D Printing Essentials: Your Day-One Starter Kit (~$30-50)
These are the 3d printing must haves you should grab before (or with) your first printer. Without them, you will struggle to remove prints safely, check accuracy, or handle basic assembly and adjustments.
Flexible Metal Scraper or Spatula (~$5-10)
This is your single most important tool. Every print needs to come off the build plate, and your fingers are not up to the task.
What to look for:
- Thin, flexible blade (not rigid) to slide under prints without gouging the build surface
- Angled or tapered tip for getting under edges
- Wide blade (3-4 inches) to distribute force evenly
Most printers ship with a basic scraper, but the included ones are often too thick or too flimsy. A quality painter's spatula or a dedicated 3D printing scraper from companies like BuildTak is worth the small upgrade.
Tip: Always push the scraper away from your body, and work at a low angle to the plate. Pushing straight down risks scratching PEI or glass surfaces. If your prints are consistently difficult to remove, the problem might be your bed adhesion settings rather than your technique. See our guide on how to get prints to stick properly for calibration tips.
Flush cutters have flat blades that cut support material right up against the print surface, leaving a clean edge instead of a protruding nub. Regular scissors or wire cutters leave bumps that require extra sanding.
What makes good flush cutters:
- Flat cutting edge (one side completely flush)
- Spring-loaded handles (less hand fatigue)
- Hardened steel blades (stay sharp longer)
You will use these on every single print that has support material. They also work for trimming brims and cutting filament cleanly before loading.
Digital Calipers (~$15-25)
A digital caliper measures your prints to 0.01mm accuracy. This tells you whether your printer is dimensionally accurate, whether a mechanical part will actually fit, and whether your filament diameter matches what the spool says.
When you will use them:
- Checking if a printed hole is the right size for a bolt
- Measuring filament diameter to calibrate your slicer
- Comparing print dimensions to your CAD model
- Running a temperature tower and measuring wall thickness at each segment
A $15-20 stainless steel caliper from brands like Neiko or Clockwise Tools is perfectly adequate for 3D printing. You do not need a $100 Mitutoyo unless you are doing engineering work.
Flush Cutters (~$8-12)
Hex Key (Allen Wrench) Set (~$8-15)
Almost every 3D printer uses hex-head bolts for assembly and adjustment. You will need hex keys to tighten loose belts, adjust eccentric nuts, level your bed (on manual-level printers), and swap nozzles.
Sizes you need most:
- 1.5mm, 2mm, 2.5mm, 3mm, 4mm (covers 90% of 3D printer hardware)
- Ball-end keys are worth the extra cost because they allow angled access in tight spaces
Bambu Lab printers include most necessary hex keys in the box. Creality Ender 3 series also includes a basic set, but an aftermarket ball-end set is a worthwhile upgrade.
Adhesion Helpers: Glue Stick, Painter's Tape, IPA (~$5-10)
Different materials need different adhesion strategies:
| Material | Best Adhesion Method |
|---|---|
| PLA | Clean plate with IPA (usually sufficient) |
| PETG | Glue stick (also acts as a release agent, prevents bonding too hard) |
| ABS/ASA | Glue stick or ABS slurry on a heated bed |
| TPU | Clean plate, no additives needed |
Isopropyl alcohol (IPA), 90%+: Your daily bed cleaner. Wipe the build plate before every print to remove fingerprint oils and dust. This alone solves most first-layer adhesion issues.
Glue stick (PVA-based, like Elmer's): A thin layer creates a sticky surface for stubborn materials. Also serves as a barrier for PETG, which can permanently fuse to bare PEI.
Painter's tape (blue, wide): Older adhesion method. Less common now with textured PEI plates, but still useful on glass beds.
3D Printing Post Processing Tools (Intermediate Kit, ~$40-80)
Once your prints come off the bed reliably, these 3d printing post processing tools help you turn rough outputs into polished, professional-looking pieces.
Sandpaper Set: 120 to 2000 Grit (~$10-15 for a variety pack)
Sanding is the most effective way to remove layer lines and achieve a smooth surface finish. Buy a variety pack that includes:
- 120-220 grit: Aggressive removal of large imperfections, support witness marks, blobs
- 400-600 grit: General smoothing of layer lines
- 800-1200 grit: Preparing for paint or a satin finish
- 1500-2000 grit: Mirror-like polish (especially with wet sanding)
Wet sanding (dipping paper in water while sanding) works exceptionally well on PLA and PETG. It reduces dust, prevents clogging, and produces a smoother result than dry sanding at the same grit.
Sanding sticks (foam-backed abrasive strips) conform to curved surfaces better than flat sheets. You can make your own by wrapping sandpaper around popsicle sticks.
Hobby Knife / X-Acto Knife + Cutting Mat (~$10-15)
A sharp hobby knife handles tasks that flush cutters cannot reach:
- Cleaning up brim edges flush with the print
- Trimming filament strings and blobs
- Cutting away thin support remnants in tight corners
- Carving away elephant foot (bottom-layer squish)
Always use a cutting mat underneath. A self-healing cutting mat ($10) protects your desk and provides a stable, non-slip surface. The printed grid lines on quality mats also help with measuring and alignment.
Safety first: Always cut away from your body. Replace blades frequently because dull blades require more force, which increases slip risk.
Deburring Tool (~$8-12)
A deburring tool has a small, hook-shaped blade that swivels to follow contours. It excels at:
- Cleaning the inside of printed holes to exact size
- Removing the "elephant foot" ridge on bottom layers
- Trimming brim attachment points without damaging the print
This tool is more precise and safer than a hobby knife for cleaning edges and holes. Once you try it, you will wonder how you managed without one.
Needle Files (Set of 6-10) (~$10-15)
Where sandpaper wraps and flexes, files cut with precision. A basic set includes:
- Flat file: For flat surfaces and edges
- Half-round file: For concave curves and slots
- Round file: For enlarging holes
- Triangular file: For sharp internal corners
- Square file: For rectangular slots
Use files for areas where sandpaper cannot reach: inside square holes, narrow slots, tight radius curves, and anywhere you need to remove material quickly and precisely.
Tweezers: Straight + Angled (~$5-8 per pair)
Keep two types:
- Straight tweezers: Grabbing filament strings, removing small support bits, pulling ooze from the nozzle before a print starts
- Angled/curved tweezers: Reaching into recessed areas, grabbing debris from inside prints
Heat-resistant tweezers (ceramic or stainless with insulated grips) are useful for pulling filament from a hot nozzle during maintenance. Regular tweezers work for everything else.
If your prints frequently have thin strings between features, the underlying issue is likely retraction settings. See our stringing troubleshooting guide for proper calibration steps.
Heat Gun (~$20-30)
A heat gun is the multi-purpose secret weapon in any 3d printer tool kit:
- Remove stringing: A quick pass with a heat gun melts away thin strings instantly without touching the print
- Bend and shape: Heat a section and reshape it before it cools (useful for fitting prints together)
- Smooth surfaces: Careful, controlled passes can partially melt PLA surfaces to reduce layer visibility
- Shrink-wrap: Heat-shrink tubing over connections and joints
A basic 300W craft heat gun ($20) is sufficient. You do not need a $50+ industrial model. Keep it moving to avoid melting or deforming your print.
3D Printer Maintenance Tools (Keep Your Machine Running)
Preventive maintenance avoids mid-print failures. These tools pay for themselves the first time they save a clogged nozzle or a jammed axis.
Nozzle Cleaning Kit: Acupuncture Needles + Brass Brush (~$8-12)
Partial clogs are the most common cause of under-extrusion and inconsistent layers. A nozzle cleaning kit contains:
- Acupuncture needles in 0.3mm, 0.4mm, 0.5mm sizes to push through clogs from below
- Brass wire brush to clean melted filament from the nozzle exterior
How to use: Heat the nozzle to printing temperature, then insert the needle from below and push gently. The heat softens the clog while the needle breaks it up. Wipe the outside with the brass brush while hot.
Use a brass brush specifically (not steel). Steel is harder than brass nozzles and will scratch them. Brass is softer and cleans without damage.
Spare Nozzles (~$2-5 each, buy 3-5)
Nozzles are consumables. Standard brass nozzles wear out after 500-1000 print hours, faster with abrasive filaments (carbon fiber, glow-in-dark, wood-fill).
What to stock:
- 2-3 spare standard 0.4mm brass nozzles (your everyday workhorse)
- 1 hardened steel nozzle (for abrasive materials, lasts 10x longer)
- Optional: 0.6mm nozzle for faster prints when detail is less critical
For a deeper understanding of when to swap nozzle sizes and what each diameter does to print quality, see our nozzle sizes guide.
Lubricant: White Lithium Grease or PTFE Lube (~$8-12)
Your printer's lead screws and linear rails need periodic lubrication to move smoothly and quietly.
What to use:
- Lead screws (Z-axis): White lithium grease or specialized 3D printer lube (like Magnalube or Super Lube)
- Linear rails: PTFE dry lubricant (does not attract dust like wet lubes)
- Bearings: Light machine oil, one drop per bearing
What NOT to use: WD-40. It is a solvent, not a lubricant. It displaces moisture short-term but gums up with dust and leaves a sticky residue that accelerates wear.
Frequency: Every 100-200 print hours, or whenever you hear squeaking, grinding, or notice Z-axis banding in your prints.
Filament Storage: Desiccant + Sealed Containers (~$15-30)
Filament absorbs moisture from the air. Wet filament causes popping sounds during printing, rough surface finish, stringing, and weakened layer adhesion.
Budget solution (~$15): Large Ziploc bags or airtight cereal containers with rechargeable silica gel packets inside.
Better solution (~$30-60): A dedicated filament dry box (like SUNLU S2 or eSUN eBOX) that both stores and feeds filament to your printer while keeping it dry.
Critical for: Nylon, PETG, TPU, and any filament stored for more than a few weeks in humid environments. PLA is less sensitive but still benefits from dry storage during long-term storage.
3D Printing Tools for Beginners: Safety Equipment
This is the section most tool guides skip, but safety matters, especially if you are printing in a bedroom, home office, or near children and pets.
Nitrile Gloves (~$10 for a box of 100)
Essential for resin (SLA/DLP) printing. Uncured resin is a skin sensitizer. Repeated exposure without gloves can cause permanent allergic reactions. Always wear nitrile gloves when handling resin, removing prints from the build plate, and washing prints in IPA.
For FDM printing: Gloves are optional but helpful during post-processing (filing, sanding) and when cleaning the hotend or build plate with IPA.
Why nitrile specifically: Latex gloves are dissolved by resin and IPA. Vinyl gloves are too thin. Nitrile resists chemicals, fits snugly, and provides good dexterity.
Safety Glasses (~$5-10)
Wear them when:
- Cutting supports (small pieces fly unpredictably)
- Sanding prints (plastic dust)
- Using a Dremel or rotary tool
- Handling resin (splash risk)
Any ANSI Z87.1 rated glasses work. Wraparound styles provide better coverage than flat-front glasses.
Ventilation and Air Filtration
Different materials have different risks:
| Material | Risk Level | Minimum Precaution |
|---|---|---|
| PLA | Low (still releases UFPs) | Open window or room ventilation |
| PETG | Low-Medium | Same as PLA |
| ABS/ASA | High (styrene fumes) | Active ventilation or enclosure with filter |
| Resin (SLA) | High (VOCs) | Well-ventilated room, ideally with exhaust fan |
For a complete breakdown of which filaments produce harmful emissions and how to protect yourself, see our detailed guide on whether 3D printing is toxic.
Budget ventilation: Print near an open window with a desk fan pushing air outward. Better: An enclosed printer with a carbon filter or a dedicated exhaust fan venting outside.
Self-Healing Cutting Mat (~$10-15)
You will do a lot of cutting, filing, and trimming at your desk. A cutting mat:
- Protects your work surface from knife cuts and scratches
- Provides a non-slip surface for holding parts
- Includes measurement grids for quick reference
- Self-heals from blade cuts (lasts years)
Size A3 (12x18 inches) is the sweet spot for most desks.
Best 3D Printer Tool Kit: Buy a Bundle or Build Your Own?
Pre-Made Kits (~$25-50)
Amazon and AliExpress sell "3D printer tool kit" bundles containing 20-40 tools in a zipper case. These typically include: scrapers, flush cutters, tweezers, needle files, hex keys, nozzle cleaning needles, deburring tool, and sometimes calipers.
Pros: Convenient, everything in one purchase, usually good value per-tool. Cons: Quality varies wildly. Some kits include flimsy tools that dull quickly. You often get redundant items (3 scrapers but no heat gun).
Our recommendation: A $30-40 kit from brands like AMX3D, Glarks, or IMDOITY gives you decent quality basics. Plan to replace the flush cutters and calipers with better individual items after 6-12 months of use.
Printer-Specific: What Comes in the Box
Bambu Lab (A1 Mini, A1, P1S, X1C):
- Included: Scraper, hex keys, flush cutters (basic), grease for lead screws, spare nozzle (some models), USB drive
- Still need to buy: Digital calipers, sandpaper, IPA, deburring tool, better flush cutters
Creality (Ender 3 V3, K1, K2 Plus):
- Included: Scraper, hex keys, basic toolkit, sample filament
- Still need to buy: Flush cutters, calipers, nozzle cleaning needles, sandpaper, adhesion aids
Prusa (MK4S):
- Included: Full hex key set, IPA wipes, spatula, acupuncture needle, spare nozzle
- Still need to buy: Flush cutters, calipers, sandpaper, deburring tool
Build-Your-Own Recommended Kit ($60-80 total)
If you prefer hand-picking quality tools, here is the optimal starter set:
| Tool | Approx. Cost | Priority |
|---|---|---|
| Flexible scraper (BuildTak or similar) | $8 | Day 1 |
| Flush cutters (Hakko or XURON) | $12 | Day 1 |
| Digital calipers (stainless, 6-inch) | $18 | Day 1 |
| Ball-end hex key set (metric) | $10 | Day 1 |
| IPA 90%+ (500ml bottle) | $5 | Day 1 |
| Sandpaper variety pack (120-2000) | $10 | Week 2 |
| X-Acto knife + blade set | $8 | Week 2 |
| Nozzle cleaning needles | $5 | Week 2 |
| Brass wire brush | $4 | Week 2 |
| Deburring tool | $8 | Month 1 |
| Total | ~$88 |
Useful 3D Printed Tools You Can Make Yourself
One of the best things about owning a 3D printer is that you can print your own 3d printable tools and organizers. These cost nothing beyond a few grams of filament and genuinely improve your workflow.
3D Printer Tool Holder and Organizers
Wall-mounted tool rack: Print a custom rack that holds your hex keys, screwdrivers, flush cutters, and tweezers right next to your printer. Popular designs on Printables hold 15-20 tools in a compact arrangement.
Search terms for STL files:
- "3d printer tool holder" on MakerWorld or Printables
- "workshop organizer" for general-purpose racks
- "hex key holder wall mount" for specific tool types
Desk caddy: A small desktop organizer that keeps calipers, tweezers, and nozzle needles within arm's reach. Many designs include slots sized specifically for common 3D printing tools.
Spool-mounted clips: Attach to your filament spool holder and provide hooks for scissors, cutters, and cleaning brushes right where you need them during print removal.
Functional Printed Tools
These useful 3d printed tools replace items you would otherwise buy:
Filament clip/guide: Keeps filament from tangling on the spool and guides it smoothly into the extruder. Essential if your printer does not include one.
Bed leveling knob (thumbwheel): Larger, easier-to-grip knobs for manual bed leveling that replace the tiny stock nuts on Ender 3 and similar printers.
Spool roller bearings: Reduces friction when the extruder pulls filament, preventing under-extrusion on printers with poorly designed spool holders.
Custom scraper handle: Print an ergonomic handle for a standard razor blade. Easier to grip and control than flat blade scrapers.
Nozzle organizer: A small tray with labeled holes for different nozzle sizes (0.2, 0.4, 0.6, 0.8mm). Keeps your spare nozzles organized and easy to identify.
Printer Upgrades You Can Print
Your first useful prints should include upgrades for the printer itself:
- Camera mount: Attach a webcam for remote monitoring (great with OctoPrint or Bambu Handy)
- LED light bar bracket: Mount an LED strip above the build plate for better visibility
- Cable management clips: Tidy up wiring runs and prevent cables from catching on moving parts
- Filament dry box feed-through: A fitting that lets filament pass from a sealed dry box directly to the extruder
- Tool drawer: Mounts under the printer table to hold small tools out of sight but within reach
Search "printer upgrades" + your specific printer model on Printables or MakerWorld for model-specific accessories. The community has designed hundreds of upgrades for popular printers like the Bambu Lab A1, Creality Ender 3 V3, and Prusa MK4S.
3D Printer Accessories: What Else Helps but Is Not Essential
Beyond the core 3d printer accessories listed above, these items are nice to have as your hobby grows:
Dremel / rotary tool (~$30-50): Faster material removal than hand files. Useful for drilling, grinding, and polishing. Overkill for beginners but valuable once you start doing lots of post-processing.
Helping hands / third hand tool (~$15): Holds small parts steady while you sand, glue, or paint them. Adjustable alligator clips on a weighted base.
UV flashlight (~$10): For spot-curing resin prints and checking for missed spots during post-cure. Also useful for finding cracks in prints.
Permanent marker (Sharpie): Mark measurements on prints, label versions during calibration, note settings on test pieces.
Microfiber cloths (~$5 for a pack): Lint-free cleaning for build plates, lenses, and screens. Better than paper towels which leave fibers.
Small vacuum / brush set (~$15): Clean filament shavings, support debris, and dust from inside your printer and off your workspace.
FAQ
What tools are needed for 3D printing?
At minimum, you need five things before your first print: a flexible scraper for removing prints from the bed, flush cutters for trimming supports, digital calipers for checking dimensions, a hex key set for printer adjustments, and isopropyl alcohol for cleaning the build plate. This starter set costs around $30-50 total. Everything else (sandpaper, files, nozzle cleaning tools) you can add gradually as your projects demand more finishing work.
What are 10 essential tools for 3D printing?
The ten most-used 3d printer tools across the community are: (1) flexible metal scraper, (2) flush cutters, (3) digital calipers, (4) hex key set, (5) isopropyl alcohol, (6) sandpaper in multiple grits, (7) hobby knife with cutting mat, (8) nozzle cleaning needles, (9) tweezers, and (10) PTFE lubricant. With just these ten items, you can handle print removal, quality control, post-processing, maintenance, and troubleshooting for the vast majority of projects.
What are must haves for 3D printing?
Beyond tools, the true 3d printing essentials include: a stable, level surface for your printer (vibration causes print artifacts), filament storage with desiccant (moisture ruins filament), a computer with slicer software installed, and adequate ventilation in your printing space. On the tool side, a scraper, flush cutters, calipers, and IPA are non-negotiable from day one. Everything else improves your results but is not strictly required to get printing.
Do I need different tools for resin vs FDM printers?
Yes, there is significant overlap but also key differences. FDM-specific tools include nozzle cleaning needles, spare nozzles, and lubricant for mechanical parts. Resin-specific tools include nitrile gloves (mandatory, not optional), wash/cure station, IPA in larger quantities, plastic scrapers (metal can scratch resin build plates), and a UV flashlight for checking cure completeness. Both need flush cutters, sandpaper, and calipers. If you are deciding between the two technologies, see our resin vs filament comparison for a full breakdown.
How much should I spend on 3D printer tools?
Plan for $50-100 total as a beginner, spread across your first month of printing. Start with the $30-50 day-one essentials, then add post-processing and maintenance tools as needed. Pre-made tool kits ($25-40 on Amazon) offer good value as a starting point but contain lower-quality tools that you may want to upgrade individually over time. The best investment-per-dollar tools are: quality flush cutters (upgrade from kit versions), digital calipers (a $18 branded pair outlasts $8 no-name ones), and a proper deburring tool (saves hours of knife work).