3D Printing Supports: A Complete Beginner's Guide
Learn when your 3D print needs supports, how to choose between tree and normal types, set up supports in Bambu Studio and Cura, and configure settings for easy removal. A hands-on guide for beginners.
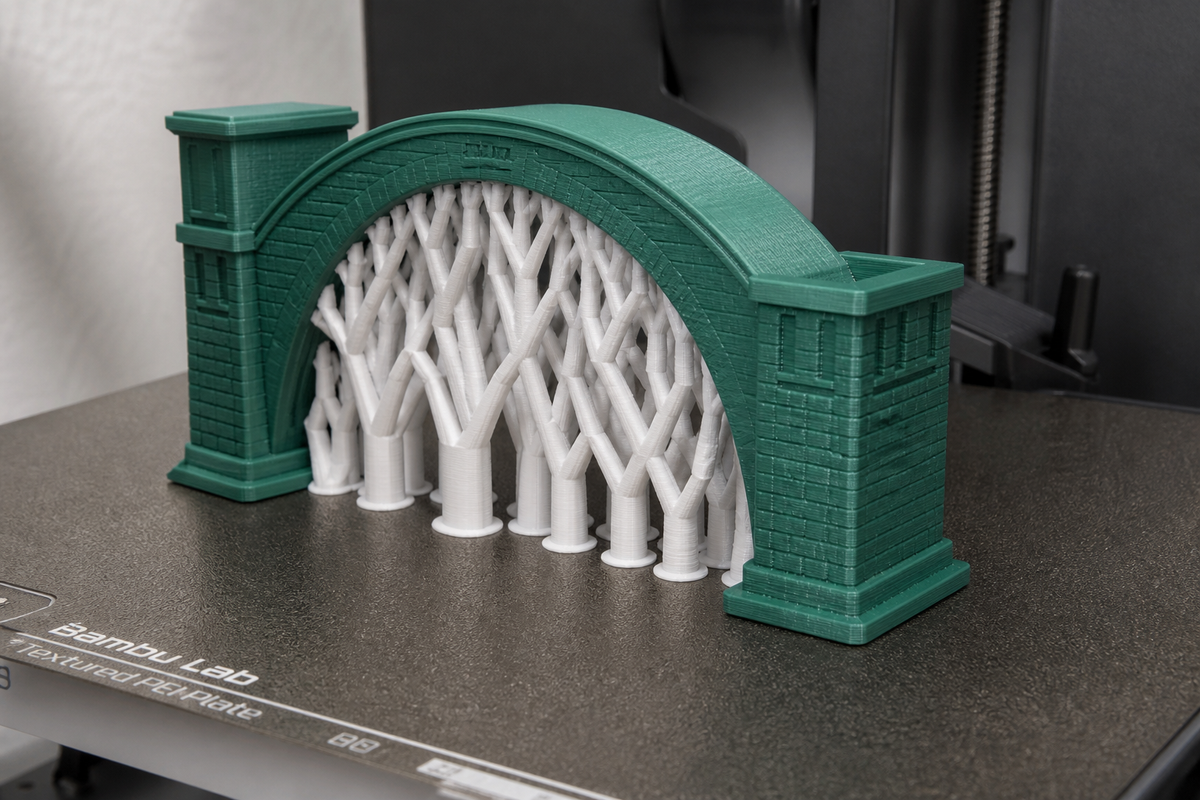
3D printing supports are temporary structures that hold up parts of your model that would otherwise collapse during printing. Think of them as scaffolding for a building under construction: they keep everything in place while the print is being made, and you remove them once it is finished.
Because 3D printers build objects layer by layer from the bottom up, any part of your model that sticks out sideways with nothing underneath it needs something to rest on. That something is a support structure.
This guide covers when you actually need supports, which type to use, how to set them up in your slicer, and most importantly, how to configure settings so they come off easily without ruining your print.
When Does Your 3D Print Need Supports?
Not every print needs supports. Many models are designed to be "self-supporting," meaning every layer has something solid beneath it. But when your model has overhangs, bridges, or floating features, supports become essential.
The 45-Degree Overhang Rule
The most important concept in 3d printing supports is the 45-degree rule: any surface that angles outward more than 45 degrees from vertical will likely fail without support material underneath.
Why 45 degrees? Each new layer is slightly offset from the one below it. Up to about 45 degrees, each layer still has enough contact with the previous layer to hold itself up. Beyond that angle, the plastic has nothing solid to grip onto and droops or curls downward.
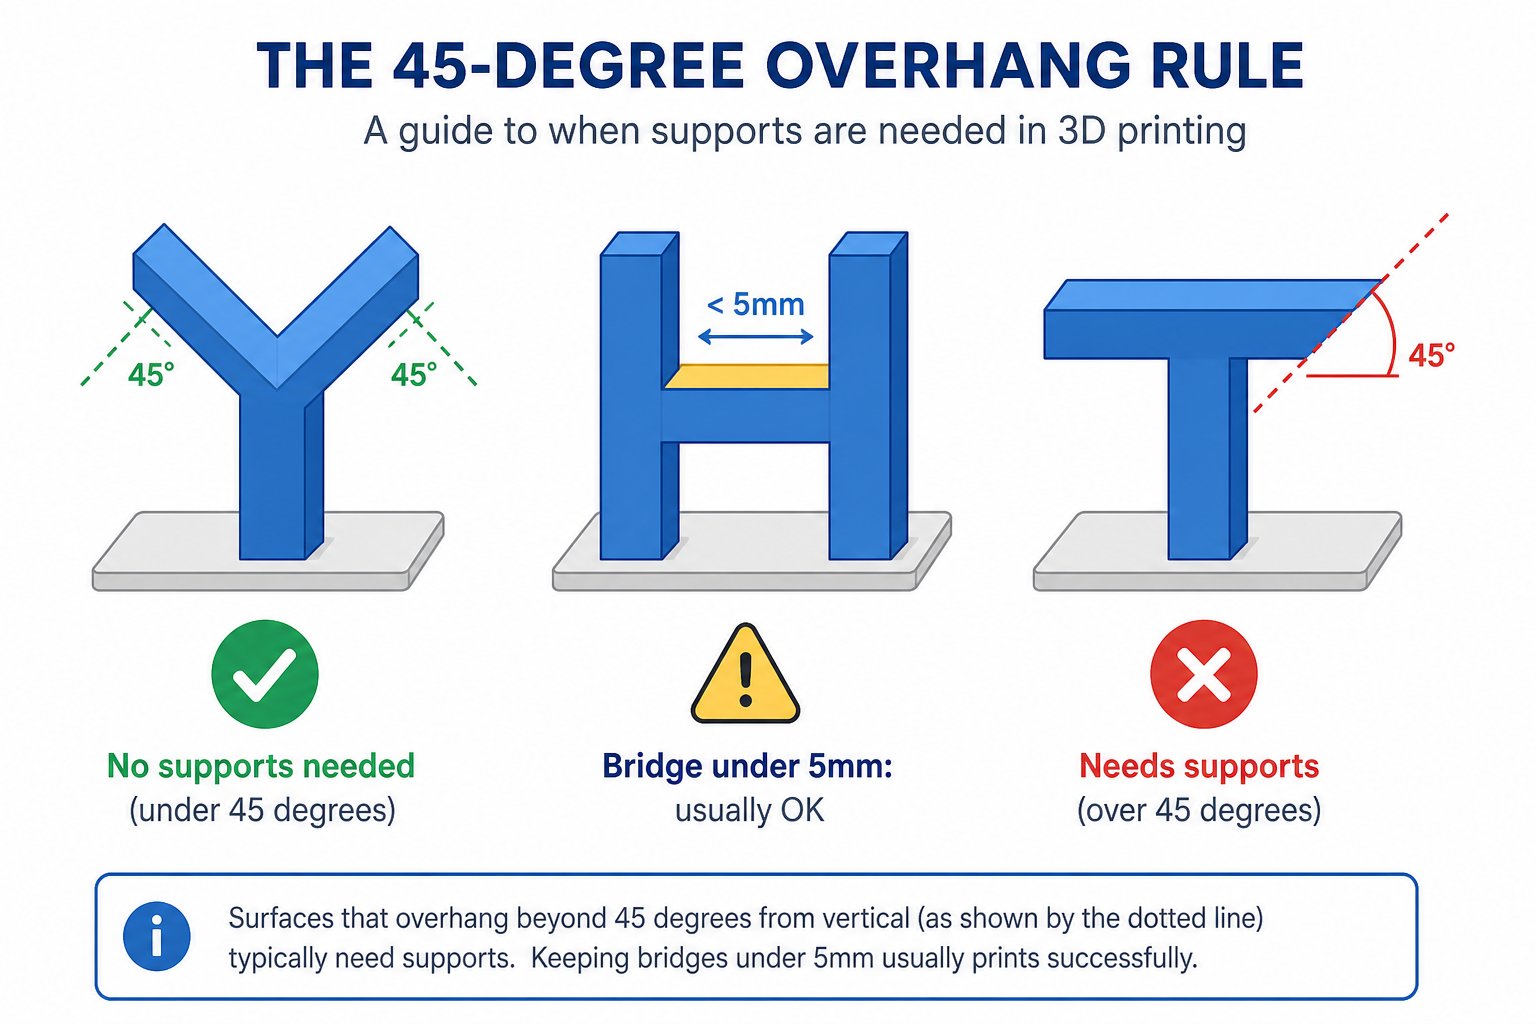
The Y-H-T test:
- Letter Y: Both arms angle at 45 degrees or less. Prints fine without supports.
- Letter H: The middle crossbar is a bridge (horizontal span between two vertical supports). If it is under 5mm, it usually prints without supports. Longer bridges need support.
- Letter T: The top arms extend straight outward at 90 degrees. Absolutely needs supports or the material will fall into thin air.
Most slicers detect these situations automatically when you enable supports. You do not need to manually calculate angles for every feature.
Bridges: The Exception to the Rule
A bridge is a horizontal span that connects two raised points, like the crossbar in the letter H. Even though it is technically a 90-degree overhang, short bridges can print successfully because the printer stretches hot filament between the two anchor points.
Bridge guidelines:
- Under 5mm: Usually prints cleanly without supports
- 5-15mm: May sag slightly in the middle, supports optional depending on quality needs
- Over 15mm: Supports recommended for a flat, accurate bottom surface
Your slicer's bridge detection and fan speed settings play a big role here. Maximum fan cooling during bridging helps the filament solidify quickly before it has time to droop.
Other Situations That Need Supports
Beyond the 45-degree rule, watch for these scenarios:
Floating islands: Parts of your model that have nothing connecting them to anything below. A character's raised arm that starts above the body, for example. The slicer will show these as isolated sections in the layer preview.
Thin, tall features: Very tall, thin pillars or towers can wobble during printing even if they do not have overhangs. Adding supports around their base prevents the vibration from ruining the print.
Enclosed overhangs: Internal overhangs inside hollow models (like the ceiling of a box) still need supports, even though you cannot see them from outside.
3D Printing Support Types: Tree vs Normal
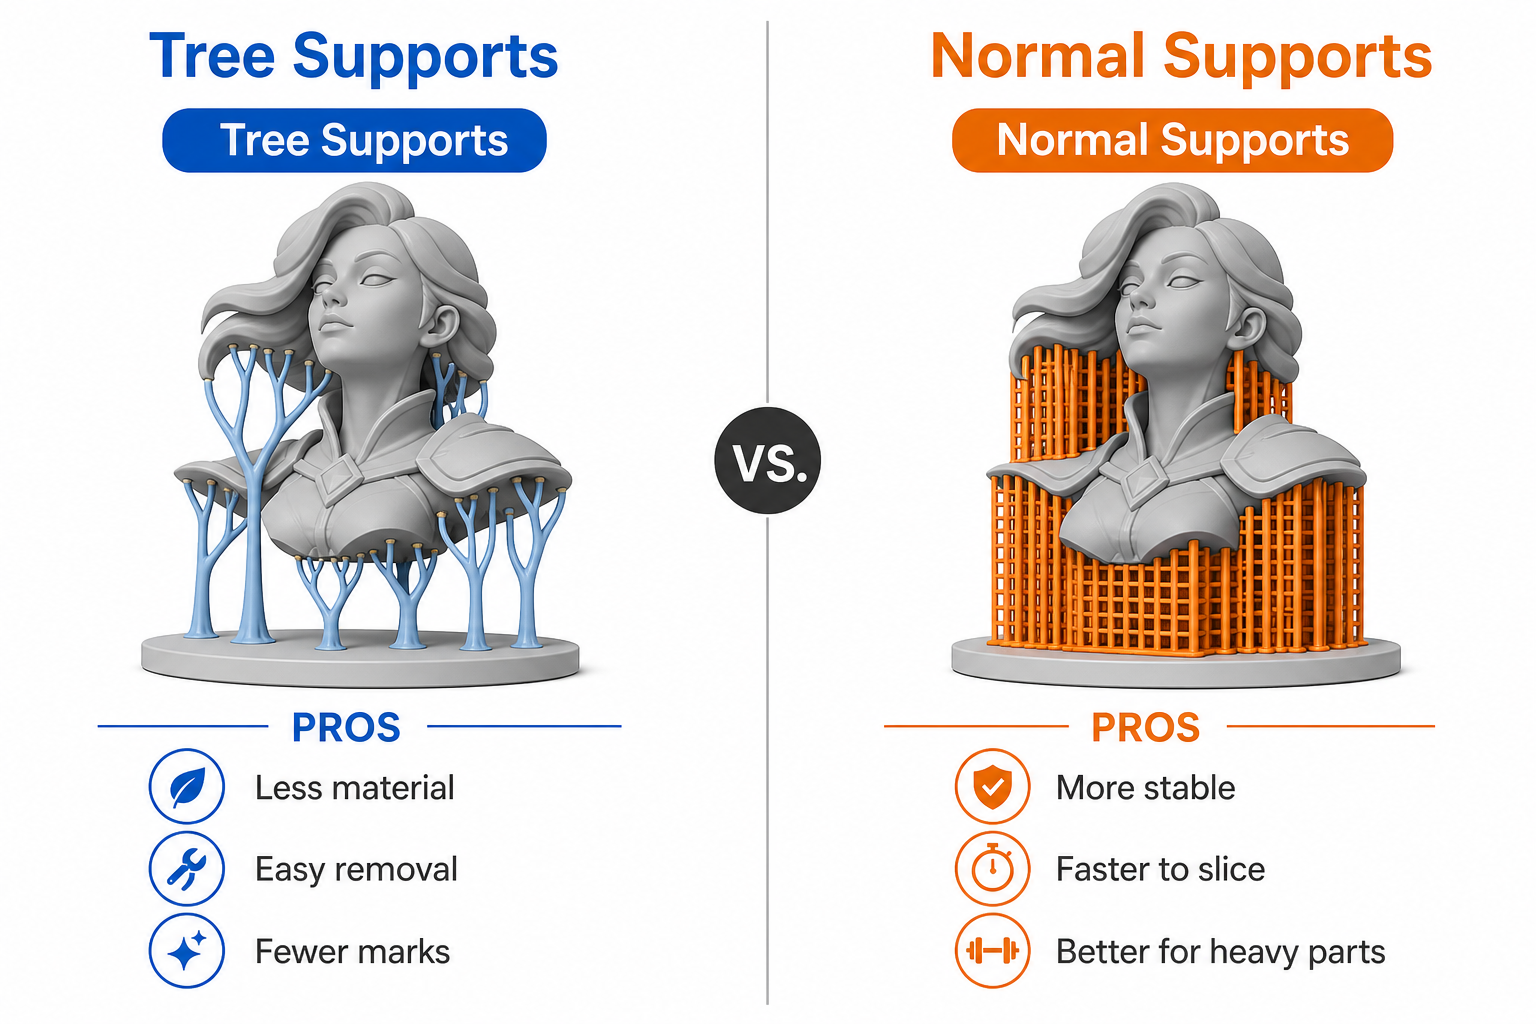
Your slicer gives you two main support styles, and choosing the right one makes a dramatic difference in removal difficulty and surface quality.
Normal (Linear/Grid) Supports
Normal supports are the traditional 3d printing support structure. They create vertical columns of material in a repeating pattern (lines, grid, or zigzag) that fill the entire area beneath each overhang.
How they work: The slicer generates a flat "floor" on the build plate, then builds up columns in the chosen pattern until they reach the bottom surface of your overhang. A thin interface layer sits on top to provide a smooth contact surface.
Strengths:
- Maximum stability for heavy overhangs and large flat surfaces
- Fast to calculate (no complex branching algorithms)
- Reliable and predictable
Weaknesses:
- Use significantly more material
- Harder to remove (larger contact area with the model)
- Leave more visible marks on supported surfaces
- Can be difficult to access in tight spaces
Best for: Functional/mechanical parts, flat bottom surfaces, large overhangs, and prints where strength during printing matters more than cosmetic finish.
Tree Supports
Tree supports in 3d printing grow upward from the build plate like branches of a tree, only touching your model at the very tips of each branch. Instead of filling the entire area with columns, they use minimal contact points.
How they work: The slicer calculates the most efficient branching structure that reaches all overhang areas while minimizing material use. Thick trunks split into progressively thinner branches that end at tiny contact points against the model.
Strengths:
- Far less material used (30-50% less than normal supports)
- Much easier to remove (often snaps off by hand)
- Minimal surface marks (tiny contact points)
- Can reach into tight spaces normal supports cannot
Weaknesses:
- Takes longer to slice (complex calculations)
- Less stable for very heavy, wide overhangs
- Can occasionally fail to reach certain geometries
Best for: Figurines, organic models, display pieces, anything where surface quality matters, and prints with scattered small overhangs in hard-to-reach areas.
A 3d print tree support is the recommended default for most beginners. Start with tree supports and only switch to normal supports if you notice instability or failed overhangs.
Organic Supports (Bambu Studio, OrcaSlicer)
Organic supports are a newer evolution available in Bambu Studio, OrcaSlicer, and recent versions of PrusaSlicer. They combine the efficiency of tree supports with smarter pathing algorithms.
Key differences from standard tree supports:
- Smoother, more flowing branch structures
- Better at wrapping around complex geometry
- Even fewer contact points
- Slightly longer calculation time
If your slicer offers organic supports, use them. They are the best option available in 2026 for the majority of prints.
Quick Decision Table
| Your print is... | Best support type |
|---|---|
| A figurine, miniature, or character model | Tree / Organic |
| A mechanical bracket or housing with flat overhangs | Normal (Grid) |
| A decorative piece with scattered small overhangs | Tree |
| Very tall with a heavy top section | Normal (20%+ density) |
| A display model where surface quality is priority | Tree / Organic |
| A quick prototype where appearance does not matter | Normal (fastest) |
How to Add Supports in Your Slicer (Step-by-Step)
Knowing the theory is one thing. Here is exactly how to enable and configure supports in the three most popular slicers.
Bambu Studio / OrcaSlicer
- Import your model and go to the "Print Settings" panel on the right
- Enable supports: Scroll to "Support" section and toggle "Enable support" to ON
- Choose type: Select from the dropdown:
- "Normal (Auto)" for grid/column supports
- "Tree (Auto)" for tree supports
- "Organic" for organic tree supports (recommended)
- Set threshold angle: Default is 40-45 degrees. This controls which overhangs get supports. Lower = more supports generated. Keep at 40 for beginners.
- Support placement:
- "Build Plate Only" = supports only grow from the bed (try this first)
- "Everywhere" = supports can grow from any surface including the model itself
- Manual paint-on supports: Switch to the "Support painting" tool in the left toolbar. Paint green areas where you WANT supports, paint red where you want to BLOCK supports. This gives you precision control.
Recommended starter settings for Bambu Studio:
- Type: Organic
- Threshold: 40 degrees
- Placement: Build Plate Only (switch to Everywhere only if preview shows unsupported areas)
- Top Z distance: 0.2mm
- Interface layers: 3
Cura (Creality, Ender 3 V3, etc.)
- Import your model into the viewport
- Enable supports: In the right panel, scroll to "Support" and check "Generate Support"
- Choose structure: "Support Structure" dropdown:
- "Normal" for traditional grid supports
- "Tree" for tree supports
- Support placement:
- "Touching Buildplate" = only from the bed
- "Everywhere" = from any surface
- Key settings to adjust:
- "Support Overhang Angle": 45 degrees (default, good for most prints)
- "Support Density": 10-15% for easy removal
- "Support Z Distance": 0.2mm (1 layer height gap)
- "Support Interface": Enable, set to 2 layers at 80% density
- Support blocker: Click your model, then use "Per Model Settings" > "Modify settings for overlap" to block supports in specific areas. Or use the support blocker tool to place invisible boxes where supports should not generate.
Recommended starter settings for Cura:
- Structure: Tree
- Placement: Touching Buildplate
- Overhang Angle: 45 degrees
- Density: 12%
- Z Distance: 0.2mm
- Enable Support Interface: Yes, 2 layers
PrusaSlicer
- Import your model and go to "Print Settings" tab
- Enable supports: Under "Support material" section, set "Generate support material" to ON
- Style: Choose from:
- "Grid" (traditional column supports)
- "Snug" (tighter-fitting supports that waste less material)
- "Organic" (tree-style supports, newest option)
- Support placement:
- "Support on build plate only" = safest starting point
- "For support enforcers only" = manual placement only
- Manual paint supports: Right-click model > "Add support enforcers" to paint areas that need supports, or "Add support blockers" for areas that should not have them
- Contact Z distance: Set to 0.2mm for PLA, 0.25mm for PETG (PETG bonds more aggressively)
3D Printing Support Settings for Easy Removal
This is where most beginners struggle. Your 3d printing supports are hard to remove because the default settings in most slicers prioritize print stability over removal convenience. Here are the settings that make the biggest difference:
Z Distance (The Most Important Setting)
Z distance is the tiny vertical gap between the top of the support and the bottom of your model. This gap is what allows the support to separate cleanly instead of fusing permanently.
- Too small (0.1mm or less): Support fuses to the model. Nearly impossible to remove without damaging the surface.
- Too large (0.4mm+): First layer above the support sags badly because it has nothing to rest on.
- Sweet spot: 0.2-0.3mm (equal to 1 layer height for most printers)
For PETG, increase Z distance to 0.25-0.3mm. PETG is stickier than PLA and bonds more aggressively to supports.
Support Interface Layers
Interface layers are thin, dense layers that sit between the support columns and your model. They create a flat, smooth "roof" on the support structure.
Why they matter:
- Without interface: rough, uneven contact = messy underside on your model
- With interface: smooth, uniform contact = cleaner underside AND easier separation
Recommended settings:
- Enable support interface: Yes
- Number of interface layers: 2-3
- Interface density: 80-100%
- Interface pattern: Rectilinear or Concentric
The combination of a dense interface plus proper Z distance gives you the best of both worlds: stable support during printing and clean separation afterward.
Support Density
Support density controls how much material fills the inside of the support columns. Lower density = easier to remove but less stable.
| Density | Result | Use When |
|---|---|---|
| 5-8% | Very easy to remove, but may collapse on tall prints | Short supports, small overhangs |
| 10-15% | Good balance of stability and removal ease | Most prints (recommended default) |
| 18-25% | Very stable, harder to remove | Heavy overhangs, tall prints, large flat surfaces |
| 30%+ | Extremely stable, very hard to remove | Only for critical engineering parts |
Support Placement: Build Plate Only vs Everywhere
"Build Plate Only" means supports can only grow upward from the build plate. They cannot start from the surface of your model.
- Pro: Much easier to remove (no supports stuck inside crevices of your model)
- Con: Cannot reach overhangs that are directly above other parts of the model
"Everywhere" means supports can grow from any surface, including the model itself.
- Pro: Reaches all overhangs regardless of geometry
- Con: Leaves marks on your model where supports attached to it
Strategy: Always try "Build Plate Only" first. Check the slicer preview to see if all overhangs are supported. Only switch to "Everywhere" if you see unsupported areas that would clearly fail.
Settings Quick Reference Table
| Setting | Easy Removal | Maximum Stability |
|---|---|---|
| Z Distance | 0.25-0.3mm | 0.15-0.2mm |
| Density | 10-12% | 20-25% |
| Interface Layers | 2 layers, 80% density | 3 layers, 100% density |
| Pattern | Zigzag (snaps cleanly) | Grid (stronger) |
| Support Type | Tree / Organic | Normal (Grid) |
| Placement | Build Plate Only | Everywhere |
How to Remove 3D Printing Supports Without Damage
Even with perfect settings, removal technique matters. Here is the correct approach for FDM and resin prints.
FDM Support Removal
Step 1: Start by hand. Grip the support at its base and flex it side to side. Well-configured tree supports often snap off with gentle finger pressure. Do not yank straight outward because that can pull chunks from your model.
Step 2: Flush cutters for connections. Use flush cutters to clip the points where support meets the model. Cut as close to the model surface as possible without touching it.
Step 3: Needle-nose pliers for tight spots. For supports inside holes, between thin walls, or in recessed areas, pliers give you the grip and reach your fingers cannot.
Step 4: Hobby knife for remnants. Thin ridges or bumps left at contact points can be carefully sliced away with an X-Acto knife. Work at a shallow angle to avoid gouging.
Step 5: Sand the marks smooth. Start with 200-grit sandpaper on support marks, then work up to 400-600 for a clean finish. If the print will be painted, priming also helps fill minor marks.
For prints where you enabled ironing on top surfaces, note that supported bottom surfaces will always be rougher than ironed top surfaces. Plan your model orientation so the most visible surfaces face upward during printing.
Resin Printing Supports Removal
Resin 3d printer supports are different from FDM supports. They are thin, tree-like structures with tiny contact points (0.3-0.5mm tips).
Key difference: remove BEFORE full UV cure. Resin supports are much easier to remove when the print is still slightly soft after the initial wash. Once fully cured, the tiny tips become brittle and may leave divots when snapped off.
Process:
- Wash print in IPA as normal
- Remove supports with flush cutters or by hand (they should snap easily)
- Sand any remaining nubs with fine-grit sandpaper (400+)
- THEN fully cure under UV light
Resin printing supports are always required, even for surfaces that look flat, because the peeling force during printing would rip unsupported sections off the build plate. For more context on resin vs FDM workflows, see our resin vs filament comparison.
Soluble Supports (Dual-Extruder Printers)
If you have a printer with two extruders (or a multi-material system), you can print supports in water-soluble material:
- PVA dissolves in warm water. Pairs with PLA. Soak for 4-12 hours and supports disappear completely.
- HIPS dissolves in limonene (d-limonene solution). Pairs with ABS.
Soluble supports leave zero marks and require zero manual removal. The trade-off is cost (PVA filament is expensive) and print complexity (dual extrusion calibration). But for complex geometries with internal overhangs that you cannot physically reach with tools, soluble supports are the only option.
How to 3D Print Without Supports
The best support is no support at all. Every support you avoid saves material, print time, and post-processing effort. Here are strategies to reduce or eliminate the need for supports entirely.
Rotate Your Model
The simplest trick: change your model's orientation on the build plate. An overhang that is 60 degrees in one orientation might become 30 degrees (self-supporting) if you tilt or rotate the model.
Example: A character with an outstretched arm might need heavy supports printed upright. But if you tilt the model backward 30 degrees, that arm might fall within the self-supporting range. Check multiple orientations in your slicer's preview before committing.
Split Into Multiple Parts
For models with unavoidable overhangs, consider splitting the model at overhang points:
- Cut the model in your CAD software or using the "Cut" tool in your slicer
- Print each piece flat on the bed (no supports needed)
- Glue together with super glue or plastic cement
A split-and-glued model is often stronger at the joint than a supported section is on its underside. The bond between two flat, mating surfaces is stronger than the rough, partially-supported underbelly of an overhang.
Design with Self-Supporting Geometry
If you design your own models, build the 45-degree rule into your shapes:
- Chamfers instead of overhangs: A 45-degree chamfer on the underside of a shelf makes it self-supporting
- Teardrop holes: Horizontal circular holes need supports at the top. A teardrop shape (pointed at the top) is self-supporting
- Gradual angles: Instead of a sudden 90-degree overhang, use a gradual curve that never exceeds 45 degrees
Use a Brim, Not Supports, for Adhesion Problems
Beginners sometimes confuse supports with bed adhesion tools. If your print is lifting from the build plate (warping, not sticking), the solution is a brim or raft, not supports.
- Supports = hold up overhangs in the air
- Brim = extends the first layer outward for better grip on the bed
- Raft = a thick base layer that your print sits on top of
If your issue is the bottom of the print not sticking, supports will not help. A brim almost certainly will.
Resin Printing Supports: How They Differ from FDM
Resin printing supports deserve their own discussion because they work fundamentally differently from FDM supports.
Why resin prints ALWAYS need supports:
In FDM, the question is "does this overhang have something beneath it?" In resin printing, the question is different: "can this layer resist the peel force when the build plate lifts?"
Resin printers (LCD/DLP/SLA) cure liquid resin against a film at the bottom of the vat. After each layer cures, the build plate lifts up, peeling the cured layer away from the film. This peeling creates suction force. Without adequate supports, that force rips sections of the print off the plate or deforms thin features.
Key differences in resin supports:
- Much thinner structure (0.3-0.5mm contact points vs 1-2mm in FDM)
- Always tree-style (no grid/column supports in resin)
- Model orientation matters enormously (tilt 30-45 degrees to minimize cross-section per layer = less peel force)
- Auto-generated by resin slicers (ChiTuBox, Lychee Slicer, UVtools)
- Light/medium/heavy tip options depending on the weight the support carries
Resin support tips for beginners:
- More supports is safer than fewer (a failed resin print wastes expensive resin)
- Orient the model so the largest flat surfaces are angled, not parallel to the build plate
- Place heavy supports on functional surfaces and light supports on cosmetic surfaces
- Always check the slicer's "island detection" feature, which finds unsupported floating sections
Common Support Mistakes Beginners Make
Mistake 1: Using supports when you do not need them. Check the slicer preview before adding supports. Many models are designed to be self-supporting. Unnecessary supports waste material and create marks you will need to clean up.
Mistake 2: Using "Everywhere" placement by default. Start with "Build Plate Only." Supports that grow from your model's surface are much harder to remove and leave worse marks than supports growing from the bed.
Mistake 3: Setting density too high. The default in many slicers is 15-20%. For most PLA prints with tree supports, 10-12% is plenty. Higher density just makes removal harder without meaningful stability improvement for normal-sized overhangs.
Mistake 4: Forgetting to check Z distance for PETG. PETG is notorious for fusing to supports. If your 3d printing supports are hard to remove and you are printing PETG, increase your Z distance to 0.25-0.3mm. This single setting change solves most PETG support nightmares.
Mistake 5: Not using support interface layers. Without interface layers, the top of the support is rough and uneven. This means your model's underside is also rough and uneven. Enabling 2-3 interface layers dramatically improves the quality of supported surfaces and actually makes removal cleaner because the separation happens at a well-defined boundary.
FAQ
What supports should I use for 3D printing?
For most beginners, tree supports (or organic supports if your slicer offers them) are the best choice. They use less material, leave fewer marks, and are significantly easier to remove than normal/grid supports. Switch to normal supports only for prints with very heavy, wide flat overhangs where tree supports might not provide enough stability. In Bambu Studio, select "Organic"; in Cura, select "Tree"; in PrusaSlicer, select "Organic" as the support style.
Should I add supports to my 3D print?
Only if your model has overhangs steeper than 45 degrees from vertical, bridges longer than 10-15mm, or floating sections with nothing beneath them. Many models, especially functional parts and geometric designs, are deliberately designed to be self-supporting. Before enabling supports, use your slicer's layer preview (the slider that shows each layer from bottom to top) to check whether any sections are printing in mid-air. If everything connects to the layer below it, you do not need supports.
Is it possible to 3D print without supports?
Yes, for many models. The key strategies are: (1) Orient the model so overhangs stay under 45 degrees, (2) Split complex models into flat-printable pieces and glue them together, (3) Design with self-supporting geometry like chamfers and teardrop holes, and (4) Accept slightly rough bridged sections on short horizontal spans under 10mm. Powder-based technologies like SLS do not need supports at all because the unsintered powder holds everything in place, but for FDM (the most common consumer technology), thoughtful orientation solves most support situations.
Why are my 3D printing supports so hard to remove?
The most common cause is Z distance set too low, which allows the support to partially fuse with the model. Increase Z distance to 0.2-0.3mm (about one layer height). The second cause is using grid/normal supports at high density when tree supports would work fine. Try switching to tree supports at 10-12% density. Third, PETG specifically bonds very aggressively to supports because it stays sticky at printing temperature longer than PLA. For PETG, always increase Z distance to 0.25-0.3mm and lower support density to 10%.
Do supports waste a lot of filament?
It depends on the model and support type. Normal/grid supports for a complex model can add 30-50% extra material. Tree supports are much more efficient, typically adding only 10-20% extra material. For a standard figurine, tree supports might use 5-10g of filament for a 30g model. You can reduce waste further by using "Build Plate Only" placement, lowering density to 10%, and orienting the model to minimize overhang area. The time cost is usually more significant than the material cost, since supports add both print time and post-processing time.